Autopsy of a Sweated Copper Joint

Users who are viewing this thread

PhilUpNorth

Engineer
Messages
10
Reaction score
0
Points
1
Location
Montreal, Canada
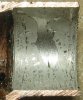
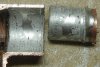
Hello. While in the middle of a small plumbing change job in my house, feelling pretty good about my soldering skills, I decided just for fun to tear apart a joint I had just made to see if it was as good inside as it looked outside. Well, as you can see on the attached picture, I found some pretty big voids in the fitting, and I guess that this is indicative of a problem with my technique. Any clues as to what the problem may be? Also, if I assume that all of the joints I've been doing for many years were done the same way, with the same equipment, and with the same materials, then does it mean that I've got to start opening up walls to redo the joints? Thanks for any thoughts.

Phil
 

Attachments

  • Joint.jpg
    Joint.jpg
    30.6 KB · Views: 657

Alternety

Like an engineer
Messages
768
Reaction score
0
Points
16
Location
Washington
I am a bit confused by the picture. It appears you cut a pipe in half. How did you get the inner piece out to show the solder interface? If you heated it, the observed patterns may not be a real indicator of the finished joint. What does the other piece look like?

If you are not getting good coverage I would think it would be linked to several factors:
Cleaning the surfaces with fine grit sandpaper​
Getting flux on all the surfaces​
Heating the joint sufficiently for free flow of solder​
You should heat the joint, not the spot where you are applying the solder.
 

Dunbar Plumbing

Master Plumber
Messages
2,920
Reaction score
10
Points
0
Location
Northern Kentucky/Greater Cincinnati Area
Website
www.KoldBreeze.com
I see nothing wrong with that connection.


If it was distorted, you'd see the copper fitting where the solder didn't flow....and that looks pretty consistent to me.


When you removed that inserted pipe is why you're seeing that imperfection.


Capillary action looks like it did what it was supposed to do.


Believe me, I know what a bad solder joint looks like; 80% copper still visible, solder "rings" around the top and bottom with nothing between. Contamination is usually to blame, lack of sanding the surface, preparing it properly.
 

Cass

Plumber
Messages
5,947
Reaction score
7
Points
0
Location
Ohio
If you think that is a bad solder joint don't ever become a plumber because you will never be able to leave your first solder job.
 
Last edited:

Jimbo

Plumber
Messages
8,918
Reaction score
18
Points
0
Location
San Diego, CA
How did you remove the pipe? If you tore it out, or heated it, then you no longer have a picture of the completed joint.

Destrucitive quality control tests involve making horizontal and vertical slices, and examining the juncition of the two pieces at the cut line.

As pointed out, it would appear that you had good capillary flow. What does the surface of the pipe look like?
 
R

Rancher

Guest
Did you use tinning flux on the joint, if not it looks great.

Rancher
 

PhilUpNorth

Engineer
Messages
10
Reaction score
0
Points
1
Location
Montreal, Canada
Is This Really The Joint?

To answer Jimbo's question about how I revealed the joint, it was pretty simple: I cut the tube a quarter inch longer than the fitting, then cut the fitting with the tube inside it in half, lengthwise. I then peeled out the tube from the fitting using pliers. So there was no smearing of the material. In fact, as you can see on the next picture, the tube part has "voids" that mirror those of the fitting. Another interesting observation is that inside the voids, the copper was covered with the soldering material because it too has the silver color. So, the voids are not because no solder ever got there, but rather because it went away somehow.

The interesting thing here is that if this joint is OK, then the sweating "dynamics" (probably mostly because of the tolerances in the gaps between the components) are such that you only get something like 50% to 75% of the area soldered.

Thanks again

Phil
 

Attachments

  • Joint2.jpg
    Joint2.jpg
    50.1 KB · Views: 626

Frenchie

Jack of all trades
Messages
1,239
Reaction score
0
Points
36
Location
Brooklyn, NY and Fire Island, NY
And if not - if there actually is something wrong with it - I'd be curious to see the outside(s) of that fitting. Any signs of over-heating, maybe? Just a WAG.

Also the other half - did it show similar (lack of) coverage?


That is an absolutely lovely job you've done with the forensic photography. Please turn this into a new hobby?

I, for one, would love to see many more examples of this, so we can start making guesses about what's typical and what's not. One fitting is hardly a scientific sample. Maybe we can all start doing it... compare notes... mmmm... my camera has a macro setting, too.
 

Got_Nailed

DIY Senior Member
Messages
276
Reaction score
0
Points
0
I just did my own test using 3/4â€. I had some voids but not as many as yours did. I put 155 psi with my compressor and it held the air.

I will say that I have never seen anyone cut a joint and pry them apart so I had no idea what it looked like. I would have thought that it would not have voids. But now that I think about it yes it should have some voids in every joint.

If you think about the way the solder is put into a joint. If you wanted the joint to not have any voids then you would have to apply the solder to the entire joint at one time and be able to cool it right after the solder is sucked in the joint. With just putting the solder on one spot at a time it will form voids because there is not any even flow all the way around the pipe.

I think that that joint looks fine.
 

Herk

Plumber
Messages
545
Reaction score
0
Points
0
Location
S.E. Idaho
The joint doesn't look like one of my own, I'm wondering why it looks the way it does. When I pull a joint apart, the solder completely covers the pipe, smoothly. There is no sign of that waxy look that I'm seeing in the photos. Could it be flux that is still in the joint or something?

FWIW - I use La-Co Regular flux and Taramet Solder.
 

Jimbo

Plumber
Messages
8,918
Reaction score
18
Points
0
Location
San Diego, CA
I still question what might be happening to the solder by ripping it out like this. I am not convinced that what we see is a good representation of the completed joint.

Let's just say I am not going to loose any sleep over the issue!!!
 

SteveW

DIY Senior Member
Messages
1,282
Reaction score
22
Points
38
Location
Omaha, NE
I'm surprised that you can pull the pipe off the fitting with pliers - I would have thought it would be too well attached to allow that.
 
Top
Hey, wait a minute.

This is awkward, but...

It looks like you're using an ad blocker. We get it, but (1) terrylove.com can't live without ads, and (2) ad blockers can cause issues with videos and comments. If you'd like to support the site, please allow ads.

If any particular ad is your REASON for blocking ads, please let us know. We might be able to do something about it. Thanks.
I've Disabled AdBlock    No Thanks