bself
New Member
I am just starting to plan for plumbing a new addition master bathroom.
First some background in the for of a few long stories made short:
1. About a year ago we had a design/build firm put in a new addition with a master suite (including new basement space). Due to setback restrictions the bathroom space was not luxurious (by today’s standards) and is roughed in as 12'7" x 6'1". Due to budget compromises we got pretty much everything we wanted except the bathroom space became an unfinished closet. So now that I have caught my breath, its time to try again.
2. It not a big job and due to the need to save a few $$, I have attempted to contract a plumber to do the rough in only. Perhaps it was the season, but out of 5 plumbers that promised, none showed up.
3. I am pretty handy. My father was in the Army Core of Engineers and among his various certifications passed several plumbing grades. Many a summer around my 12th year I spent as apprentice/gopher on his various "outside" projects. I've continued the tradition on my own projects and know just enough to be dangerous.
So since it looks like I might need to do this all myself. I am fully capable of doing all the mechanical task of putting together PVC and copper and any carpentry involved. What I know enough to know I don't know is engineering the DWV plan and the structural engineering required to muck with the joists.
Here are some illustrations before I begin asking specific questions:
<boring default layout>
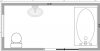
Here is a brain-dead (mostly) to scale design diagram of a functional bathroom space. I would like to do something more interesting and/or luxurious, but for now lets use this as a reference point.
<underside>
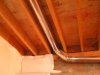
Here is the new addition's basement area directly under the bathroom space. The joists are 2"x10" 16" on center. The heating vent is 1 bay over from the door, and is supplied from the crawl space of the existing structure.
<stack 1, 2>
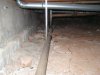
Here are some pictures of the existing waste stack. It is cast iron running horizontally under the foundation not more than a couple feet away from access of the previous picture (not counting 2 thick concrete walls, joists, and stuff).
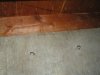
<joists>
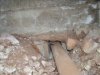
Here is the first problem in search of a solution. I would like to avoid going through the concrete (want to finish the basement and then there are those 2 intimidating, thick, well-cured walls). I’m pretty sure that leaves putting a 3.5" O.D of schedule 40 through a 2"x8" joist.
(yes this is the part of the program where Bob Vila steps out and says: "never do this! but, if you have no other choice, this is how you would do it..")
So .. any suggestions?
First some background in the for of a few long stories made short:
1. About a year ago we had a design/build firm put in a new addition with a master suite (including new basement space). Due to setback restrictions the bathroom space was not luxurious (by today’s standards) and is roughed in as 12'7" x 6'1". Due to budget compromises we got pretty much everything we wanted except the bathroom space became an unfinished closet. So now that I have caught my breath, its time to try again.
2. It not a big job and due to the need to save a few $$, I have attempted to contract a plumber to do the rough in only. Perhaps it was the season, but out of 5 plumbers that promised, none showed up.
3. I am pretty handy. My father was in the Army Core of Engineers and among his various certifications passed several plumbing grades. Many a summer around my 12th year I spent as apprentice/gopher on his various "outside" projects. I've continued the tradition on my own projects and know just enough to be dangerous.
So since it looks like I might need to do this all myself. I am fully capable of doing all the mechanical task of putting together PVC and copper and any carpentry involved. What I know enough to know I don't know is engineering the DWV plan and the structural engineering required to muck with the joists.
Here are some illustrations before I begin asking specific questions:
<boring default layout>
Here is a brain-dead (mostly) to scale design diagram of a functional bathroom space. I would like to do something more interesting and/or luxurious, but for now lets use this as a reference point.
<underside>
Here is the new addition's basement area directly under the bathroom space. The joists are 2"x10" 16" on center. The heating vent is 1 bay over from the door, and is supplied from the crawl space of the existing structure.
<stack 1, 2>
Here are some pictures of the existing waste stack. It is cast iron running horizontally under the foundation not more than a couple feet away from access of the previous picture (not counting 2 thick concrete walls, joists, and stuff).
<joists>
Here is the first problem in search of a solution. I would like to avoid going through the concrete (want to finish the basement and then there are those 2 intimidating, thick, well-cured walls). I’m pretty sure that leaves putting a 3.5" O.D of schedule 40 through a 2"x8" joist.
(yes this is the part of the program where Bob Vila steps out and says: "never do this! but, if you have no other choice, this is how you would do it..")
So .. any suggestions?