Help with Demo

Users who are viewing this thread

NurseDoe

Member
Messages
97
Reaction score
0
Points
6
Location
California High Desert
I finished most of my bathroom remodel and it looked so good, I decided to put up a new tub surround. My daughter in law, Dorothy and I got up early and began taking down some tiles using hammer and chisel. What we found underneath is another nightmare. He tiled over at least 1/2 inch plywood instead of haribacker. He used what seems to be a construction adhesive instead of thinset. We tried using a reciprical saw to cut through the wood, but it just bent up the super strong saw blades. The tiles are a nightmare to get off in areas that are not water damaged. I then tried to pry it up with a demo bar near the bathroom door but it was pulling the bathroom door jam out of whack.

I am very frustrated with this demo. Any ideas on how to get that stuff off? He seemed to think that the more nails the better, like every two inches or so. I am wondering if we should go rent a demo hammer?
 

Verdeboy

In the Trades
Messages
2,041
Reaction score
6
Points
0
Are you sure you're using sawzall blades that say they are for wood and nails? Also, for 1/2" plywood, you don't need a very long blade, either. If the blade is bending, it could just be that it is too long.

You can try using a metal-cutting sawzall blade in areas where there are a lot of nails and switching back to the other blade in areas that have less nails. Take it slow, and you should be able to cut it out successfully.
 
Last edited:

Old Dog

G.C. 22+ years(in 3 states)
Messages
82
Reaction score
0
Points
0
Location
Hawaii
Demo problems...

Sorry you stepped into a mess...
this type of demo is always a tough one for the most part.You can drill pilot holes thru the plywood(1/2"-1" wood bit) so you can get the sawszal blade in to get it cut out.Use a combo wood/ metal short blade.it's probably easier to cut it out in small sections.I would put cardboard or thin plywood down to cover your tub or shower floor so it's not damaged from any debris.
Be careful by your shower handles(need to remove them also).plumbing supply lines behind the wall.Doesn't take much to damage them with a sawszal.Just a friendly reminder... make sure to wear gloves and safety glasses while you do demo work.Tile has a nasty habit of breaking into sharp pieces when your removing it.Be careful with the sawszal too.A recipricating saw is one of the more potentially dangerous tools we use in the trades...
 

Statjunk

DIY Senior Member
Messages
540
Reaction score
0
Points
0
Hello Nurse!

Sorry had to do that.

I've read some of your posts so I've been following some of the things your getting yourself into. With that said sometimes certain parts of a project are better left to those trained to do them. This might be a good time. Do an internet search for your area for "Demolition Contractor" I think you could get someone to come in and demo that surround for you and take it with them for under $300. Not to bad considering you need a controlled demolition. Likely will only take them a few hours.

Tom
 

NurseDoe

Member
Messages
97
Reaction score
0
Points
6
Location
California High Desert
Usually, we work together, but this time Dorothy was the one using the reciprical saw and I didn't actually see how she was doing it. I bought bimetal short blades that have been great for the zillion other home demo things we have had to do. She did say that she thought that we should use a hole-maker drill first so that the blade would not bend. I will give that a try this morning.

Thanks for reminder to use gloves! I forgot at first, and my left hand is pretty scraped up, I didn't notice it until much later. We try to set a good example for our biggest helper, my six year old grandson. We bought him a great Home Depot tool box and kit that comes with real but smaller scale tools and proper safety gear, including protective eye wear that fits!

As for protecting the tub, we put heavy plasic in it, but last night on one of the home shows, the woman used a sheet of plywood to cover the tub so that she could protect the tub, but also stand on it for demo. Sounds like a great idea to me.

And if this doesnt work more easily, I am going straight to our favorite tile store and take the guy up on the offer to do the demo for 200.00. Once we saw the heavy plywood and that liquid nails stuff, we realized that this was going to be much harder than we thought. But every project we do on the addition side of the house has revealed bizarre building, dangerous wiring, and crooked plumbing. so I have some serious fears about what we may uncover with the framing

Thank you all so much for your prompt reply. You are all so very helpful and generous with your time and knowledge. Thanks
 

ms21117

New Member
Messages
5
Reaction score
0
Points
0
There is an easier way- carefully (w. good glasses) use a circular saw to cut out the entire area around the tub back to the studs - I would strongly recommend killing the elec to this area and running a long extension cord to your circ saw (or better use a battery one) u can often take out an entire wall at a time- but if not- cut out squares and remove them...then just replace w/ green board or cement backer depending on what you are putting on top...if it's a tub souround, you only need green board Good luck!
 

NurseDoe

Member
Messages
97
Reaction score
0
Points
6
Location
California High Desert
Tools

I think some of the frustration comes from the size and weight of power tools. For some reason, power tools that are more friendly to my limited strength are not very powerful. The bigger ones that get the job done quickly are heavy and difficult to hold up for long periods.

The reciprical saw is working and I have finally cut out a square. Dorothy and I saw a smaller hand held saw, that works like the reciprical saw but is much smaller. We are just not sure it is strong enough for the job. Sort of like my smaller ligher drill that is only good for light jobs, but is giving out quickly when cutting with the hole saw attachment.

In medicine/nursing we say "see one, do one, teach one" for learning a new skill. The difficulty in diy stuff is that we are not really getting to "see one" first. And when we see the home shows, they forget to mention the editing process where they cut out all the bad stuff, dropped tools etc.

I just don't feel physically strong enough to hold up the skill saw and feel like I have good control of it. My brother just called to say that he has a mini skill saw that he loves and I may just go buy one if I can't get myself to be comfortable with the sawzall. ( Funny, I had a great time cutting down tree branches with it-smaller areas are more challenging)

Thanks for the advice- It really helps!
 

Jadnashua

Retired Defense Industry Engineer xxx
Messages
32,770
Reaction score
1,190
Points
113
Location
New England
Assuming the tub surround is also used as a shower, forget the greenboard, in fact, forget the greenboard altogether unless your less than up to date inspector and codes require it. Dry, use drywall, wet, use cbu.

Also, check out https://www.johnbridge.com/ for ideas and help with demo and retiling the tub surround.
 
Last edited by a moderator:

Toolaholic

General Contractor Carpenter
Messages
894
Reaction score
6
Points
18
Location
Marin Co. Ca.
Blade stubbing

cause is inexperiance and not a strong forearm. You must have the pivot guide held rock tight against the material being cut, blades can be straightened be laying them flat against a 2x4 and hammering them flat again. Don't try to cut the tile with the recip. saw!
 

Frenchie

Jack of all trades
Messages
1,239
Reaction score
0
Points
36
Location
Brooklyn, NY and Fire Island, NY
That's a good point - the plate on the sawzall has to be held tight to the surface, or it won't cut well and it'll tire you out a lot faster. Once the cut's started, you should basically be leaning on the saw.
 

NurseDoe

Member
Messages
97
Reaction score
0
Points
6
Location
California High Desert
Well, that seems to be the problem. The shoe is not adjustable. I don't want to cut through all the insulation and the other side of the house with the five inch blade. I couldn't find a shorter one, so I give up on this. I may give my jig saw a try, but it is probably not meant for 1/2 plywood. POOP
 

Toolaholic

General Contractor Carpenter
Messages
894
Reaction score
6
Points
18
Location
Marin Co. Ca.
Good trick

Use a thin short metal cutting blade in Your sawsall. extend the shaft all the way out. Now with heavy tin snips cut the blade,at an angle, [same as factory angle] to about 1 1/4" long past the shoe. Now You can cut out drywall without fear of cutting elec. wire or copper. Pass it on! That's how I got it :D
 

Richard'sRenu

New Member
Messages
15
Reaction score
0
Points
0
I usually turn the blade around-face up rather than down. Then using a 6" blade- cut at a 45degree angle pushing the Sawsall at a 45degree angle. The you don't beat the blade up AND are able to pry the wood off easier due to the 45 degree cut. The side of the shoe glides right along on one of it's sides.

Richard
 

NurseDoe

Member
Messages
97
Reaction score
0
Points
6
Location
California High Desert
Ta-Da!

Okay guys here is the update

How we ( mostly me) finally did it the hard way. Dorothy got one small section undone and all the tiles off. Unfortunately, she dropped the demo bar more than once. She called me at work to say she was sorry that she dented the tub.

The price of inexperience? 350.00 for a new tub.

But the good news, since I was less careful about damaging the tub, I could use is for leverage. I think it is call a fulcrum. And I pried the boards off bit by bit. Sometimes, I pulled the nails out to make it easier. It took a few hours and some serious sweat but it is all off.

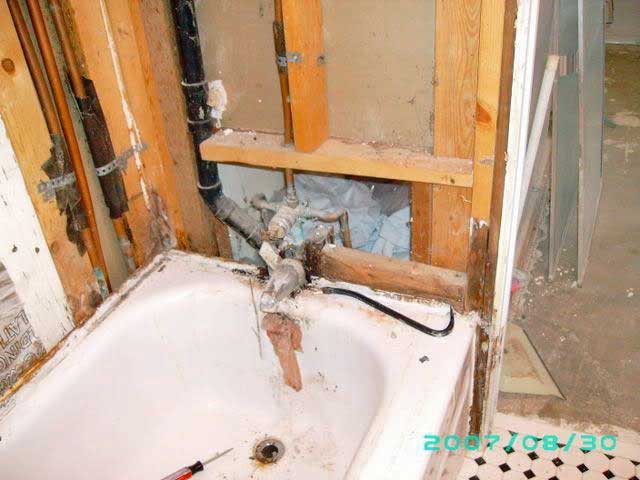
What was underneath? More drama. The outside wall seems okay, except for some water damage near the tub on a few studs. We will debate about coating with mold killer stuff or replacing them after we yank out the cast iron or steel tub.

The inside wall used to be part of the outside wall. There is a strong large beam that indicates load bearing wall. For reasons that escape us, the wall is the thickness of a 2x4. The TWO inch part? So much for the planned shampoo nitch going there.

The wall that holds the plumbing is in deep yogurt. Lots of wet, rotted wood. Luckily, it is just the closet and not load bearing. The plumbing is again imaginative. We are more convinced than ever that he had lots of elbows and couplings but no pipe cutters! So, mostly everything he did looks like that PIPE DOWN game. This time, we are prepared.

We thought about replacing my old water heater with newer tankless heater until we priced them! About 600 plus an additional 250 for venting. All that for me to have a sink and shower? Naw!

We were hopeful to do two tankless heaters because the house has two of everything. Two gas water heaters, two gas house furnace heaters etc. We were hoping to cut utilites, but at that price?

Project for the day? Remove the tub. FIRST put some wood on the floor to protect newly installed tiles. We learned the hardway blankets scoot.
Inspect yucky smelly drain for 20 years of hair and soap build up. Clean it out. Install new tub. Read directions 3 times.

Install new insulation ( not fiberglass), shampoo niche on outside wall, Hardi backer, tape and go swimming. Oh, and post pictures for all my virtual plumbers to laugh at.

nursedoe:D
 

Statjunk

DIY Senior Member
Messages
540
Reaction score
0
Points
0
Good Luck with that heavy tub. May want to get some braun in there to help you out.

Tom
 

NurseDoe

Member
Messages
97
Reaction score
0
Points
6
Location
California High Desert
Pics

Long side of tub. Pipes to water heater

View from inside my closet to interesting plumbing beneath tub The view of the tub toward the closet

Doesbathroom001.jpg
 
Last edited by a moderator:
Top
Hey, wait a minute.

This is awkward, but...

It looks like you're using an ad blocker. We get it, but (1) terrylove.com can't live without ads, and (2) ad blockers can cause issues with videos and comments. If you'd like to support the site, please allow ads.

If any particular ad is your REASON for blocking ads, please let us know. We might be able to do something about it. Thanks.
I've Disabled AdBlock    No Thanks