Glued Pipe to Cast Iron?

Users who are viewing this thread

raybigto

New Member
Messages
14
Reaction score
0
Points
0
Location
California
Hi Everyone,

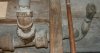
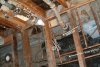
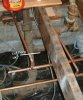
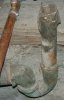
This will be my first post here. This forum is awesome. Here goes.... In removing the old tub at home, I found the tub drain connection "glued" to the p-trap. The photo shows the threading on the p-trap wasn't used to connect the brass/crome pipe. It was "glue" instead. The p-trap is also cemented to the edge of the home's foundation. They had to break some foundation to make from for it, and then mortared it in place. Removing the 90 degree elbow would require me to break some motar (foundation) to make room. How can I remove that glue to remove the crome/brass piece? As seen in photo I broke the piece (covered with tape) not knowing it was glued. Has anyone every encounted this situation? Any suggestions appreciated!

Raymond
 

Attachments

  • ironpipe.jpg
    ironpipe.jpg
    80.1 KB · Views: 873
Last edited:

raybigto

New Member
Messages
14
Reaction score
0
Points
0
Location
California
Another angle (photo)

Here's another photo with a different angle.... Hope I don't have to redo the cast iron section.
 

Attachments

  • ironpipe2.jpg
    ironpipe2.jpg
    51.8 KB · Views: 5,741

Bob NH

In the Trades
Messages
3,310
Reaction score
9
Points
0
Location
New Hampshire
A torch will take care of most glue products. If you apply heat at the joint to destroy the glue, you should be able to get the inner piece out. You may eventually have to try to collapse the piece you are taking out.

Don't cut it off because you want the handle to pull and twist.
 

hj

Master Plumber
Messages
33,603
Reaction score
1,042
Points
113
Location
Cave Creek, Arizona
Website
www.terrylove.com
drain

I cannot tell what the riser pipe material is, but the trap is brass, so the riser pipe should be a brass tubing soldered into it. That is not the correct trap for that location, which is why they soldered it in, rather than use a slip nut and washer onto the threads.
 

Cass

Plumber
Messages
5,947
Reaction score
7
Points
0
Location
Ohio
It is soldered on. I would replace as much of that old pipe as is possible while you have the floor up.

Replace drains and vents as far as you can go.
 

Coz

New Member
Messages
91
Reaction score
0
Points
0
Location
Massachusetts
I would cut the pipe behind the ty then you can convert to plastic. For the 10 mins. it would take will be worth it in the long run.
 

raybigto

New Member
Messages
14
Reaction score
0
Points
0
Location
California
Thanks!

Thanks for the replies guys. I drew up a diagram showing different points I'm considering cutting. It seems cutting at location 2, 3 and 4 would allow me to fill in with PVC (banded coupling at each). Adding a clean out at location 1 is a great idea (thanks for the tip). The 2" vents all connect to a 4" vent leading to roof at the bottom-left of picture (toilet drain). I did contemplate making the kitchen drains pvc too but after working on this project everyday after work, I'm getting worn out... Is it safe to cut at location 2 because I've got about 6 inches straight pipe. I'm planning to use a reciprocating saw with wax.
 

Attachments

  • bath.jpg
    bath.jpg
    96.8 KB · Views: 813

raybigto

New Member
Messages
14
Reaction score
0
Points
0
Location
California
Cut close up

Here's a close up of the planned cut location #2.... Last check before it's a done deal <deep breath>.
 

Attachments

  • cut.jpg
    cut.jpg
    92.6 KB · Views: 884

raybigto

New Member
Messages
14
Reaction score
0
Points
0
Location
California
Got it out!

With some heat I got the bronze pipe out. It was actually taped with masking tape and plummer puttied! Wow.... I cleaned out the threads with a wire brush and can got about normally. Just in time, the weekend is here! Time to close out this project.

Thanks all!

p.s. I'm going to leave my cast iron alone, other than the sink where I'll cut the "T" out and replace with ABS black plastic pipe.
 

Cass

Plumber
Messages
5,947
Reaction score
7
Points
0
Location
Ohio
In my NSHO I think your making a big mistake by not cutting the cast at circle #2 and replacing it all. It is so easy now and would take hardly any time to do. Even if it took you a whole day, which it shouldn't, it would be well worth the time and few $$$ spent.
 

raybigto

New Member
Messages
14
Reaction score
0
Points
0
Location
California
Tub p-trap question

nohub.jpg


If I started ABS from point 2, is the p-trap done the same way as the sink with a slip nut? Otherwise I would have to VERY precise with the plastic measurements and cutting to get center for the tub drain. Thanks for helping me put reason above the emotions to get this done. Slope is 1/2" per foot correct?

Your response was the reason I was looking for to cut at point 2. I think I will sleep better if I do the tub and sink drain in ABS.
 
Last edited by a moderator:

Cass

Plumber
Messages
5,947
Reaction score
7
Points
0
Location
Ohio
Only 1/4" /Ft. and when you cut at point 2 scrape the inside of the pipe that is left. Scrape it good and get as much buildup off the inside as possible B 4 you start replacing it. B suer when you cut it to leave 2 times what you need for the banded coupling to fit

Use a 8" level for the 1/4" /ft and as long as the bubble is just touching the line on the sight glass you are fine. Thats all you need.

Do your vents also as far as you can reasonably go.
 
Last edited:

raybigto

New Member
Messages
14
Reaction score
0
Points
0
Location
California
Thanks Cass, just finished cutting point 2, I'll keep updates for anyone who's following. Just realized that the slanted tub vent will block the way for the new tub. The old one had a gap that hid it. Also, the tub trap is connected to galvanized straight 1.5" pipe.. I'll be curious to see how this looks inside.
 
Last edited:

raybigto

New Member
Messages
14
Reaction score
0
Points
0
Location
California
after cut

I just finished cutting the cast iron w/ reciprical masonary blade and wax and the two vents w/ circular masonary blade. I have to say that the circular saw was much easier. I used some rope to support the piping to prevent it from falling after cutting. The cast iron weighs so much! The insdie of the cast iron at the cut (location #2) looks good. Now, time to get working!
 

Attachments

  • AFTERCUT.JPG
    AFTERCUT.JPG
    27.2 KB · Views: 743
Last edited:
Top
Hey, wait a minute.

This is awkward, but...

It looks like you're using an ad blocker. We get it, but (1) terrylove.com can't live without ads, and (2) ad blockers can cause issues with videos and comments. If you'd like to support the site, please allow ads.

If any particular ad is your REASON for blocking ads, please let us know. We might be able to do something about it. Thanks.
I've Disabled AdBlock    No Thanks