No Room to Sweat

Users who are viewing this thread

BS

Member
Messages
51
Reaction score
0
Points
6
Location
Central Ohio
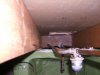
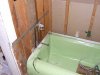
I'll be replacing the rough-in valve for my tub-shower. The hot and cold copper supply lines are 6 inches apart on center, meaning that the ends of the elbows that turn toward the valve are about 4 inches apart from each other. Between each elbow and the existing valve inlet is a little less than 1 inch of exposed copper connecting pipe which is soldered to the elbow and valve.

The problem is that the body of the new valve is also 4 inches across at its inlets. This means that the supply line elbows and valve inlets would be touching with no exposed connecting pipe between them. Sweating these joints doesn't seem possible.

I see two options:
1. When I cut the old valve out, I should be able to spread the supply lines apart a little. I think I can gain an inch or so, maybe 2 or 3 inches max. (I'll be constrained by the small tolerance in the floor plate holes the supply lines run through.)
2. Cut the supply lines below the valve and sweat on a dogleg of additional pipe to provide a wider separation at the valve. (I've had mixed success with sweating in the past, so the prospect of sweating multiple joints doesn't appeal to me. But I'll do it if I have to.)

What would you suggest? What is the minimum length of exposed connecting pipe necessary for sweating the fittings?

- Bernie
 

Jadnashua

Retired Defense Industry Engineer xxx
Messages
32,770
Reaction score
1,190
Points
113
Location
New England
Capillary action will pull solder into nearly any gap so you don't need much of any gap.
 

Racer814

New Member
Messages
124
Reaction score
0
Points
0
Location
North Carolina
heres a little tip on a T/S valve

make the drop down from the valve to the spout out of soft copper...not the part that extends through the tub, just the drop

this will allow you to tweak it just a little on trim out so that the tub spout will sit perfectly flush against the tub
 

BS

Member
Messages
51
Reaction score
0
Points
6
Location
Central Ohio
Bigger Problem

Thanks. But I just realized I have a BIGGER problem that I need to solve first.

The supply lines coming up through the floor are angled toward the tub. This places the back of the old valve out to the plane of the studs. In fact, I can run my thin metal yardstick across the studs, running it behind the shower pipe where it comes out the top of the valve. (I had previously removed the support framing.)

I'll be replacing the valve with a Kohler K-304 and will need to position the valve about 2-1/2" back into the wall from where the old one is now. But there's very little play in the supply lines -- I might be able to get an inch by securing it to new framing.

The problem seems to be caused by the horizontal portions of the supply lines below the floor not being long enough to allow the risers to go up cleanly through the holes in the subfloor and floor plate. Both risers are snug up against one side of the holes.

Any suggestions?

- Bernie
 

Chassis

Engineer
Messages
340
Reaction score
0
Points
16
Location
SE Pennsylvania
Sounds like you may have to re-route the risers to allow the valve position you need. If you can post some photos it will help people give you better suggestions.
 

BS

Member
Messages
51
Reaction score
0
Points
6
Location
Central Ohio
Here are some photos.
 

Attachments

  • DSCF1190a.JPG
    DSCF1190a.JPG
    24.4 KB · Views: 397
  • DSCF1187a.JPG
    DSCF1187a.JPG
    16.7 KB · Views: 395
  • DSCF1185a.jpg
    DSCF1185a.jpg
    35.2 KB · Views: 391

Chassis

Engineer
Messages
340
Reaction score
0
Points
16
Location
SE Pennsylvania
Looks just like the situation I am working with on my project. If the tub isn't already permanently installed, I would take it out and make the plumbing right. Install the valve where it needs to be, then run the pipes to it. You can do this easily with the tub out. Cut the risers near the bottom of the wall, then install the valve on some wood blocking. Then run pipes from the valve to the riser stubs.

You can still do this with the tub in, but it will be harder. You may have to cut a larger access hole in the other side of the wall. My vote is to take the tub back out.
 

BS

Member
Messages
51
Reaction score
0
Points
6
Location
Central Ohio
Chassis --

It's reassuring to know "it's not just me." Thanks!

My tub is already permanently in a bed of mortar. Cutting and sweating the risers near the floor is doable but it would be difficult.

An option I'm now considering is a hybrid of yours and one of my original alternatives mentioned in my first post. I could cut each riser just above the tub flange (about where the tub ell is). Then make a dogleg by adding an elbow, short horizontal length of pipe, another elbow, a vertical length of pipe, and another elbow toward the valve. This would actually allow me to solve both of my problems by positioning the valve exactly where I need it while providing a wider separation at the valve. It's more sweating than I would prefer to do, but I don't have a choice.

Let me know how yours turns out.

Another issue: The installation instructions for the Kohler valve say to install the valve on the support framing, but they don't say how. There are no mounting holes as there are on the old valve. I've got some 3/4" copper clamps I could probably use around the valve inlets, but it doesn't seem that would be secure enough.

- Bernie
 

Chassis

Engineer
Messages
340
Reaction score
0
Points
16
Location
SE Pennsylvania
BS,

Your plan will work. For the support structure, fashion a piece of wood using 1x4 or 2x4 and attach it to the studs, behind where your valve will be. Then use copper pipe straps/clamps to clamp the supply pipes to the wood, near the valve. Technically speaking the valve would not be fastened to the wood, but it would be just as stable since the clamps are near the valve.
 

hj

Master Plumber
Messages
33,603
Reaction score
1,042
Points
113
Location
Cave Creek, Arizona
Website
www.terrylove.com
valve

Street elbows on the top of the risers should solve the space problem. DO NOT use soft copper to the spout. Use rigid copper and secure the elbow in place.
 

BS

Member
Messages
51
Reaction score
0
Points
6
Location
Central Ohio
If I secure (clamp) the valve to the 2-by support, and then sweat the supply lines to the valve, as the instructions say to do in that order, isn't there a risk of the torch's flame igniting the wood? Or is it all in the technique?

- Bernie
 

Chassis

Engineer
Messages
340
Reaction score
0
Points
16
Location
SE Pennsylvania
Bernie,

You can do some sub-assembly on your workbench: new valve, elbows and a bit of riser on each side. Then use the torch to join the subassembly with the existing risers, using couplings. Plan this so that the couplings are a few inches away from the support wood. Even in doing so, scorching some wood happens. Not a big deal.
 

BS

Member
Messages
51
Reaction score
0
Points
6
Location
Central Ohio
Yes, it's a football field NOW because the photos show the existing situation with the 2x4 support removed. I'll be replacing the supply lines and valve. The instructions say to secure the valve to the support and then sweat the supply lines to the valve. With the valve inlets clamped to the wood and touching the wood and with flame applied around the inlet, how do I keep the wood from burning?

From time to time I've sweated fittings that were near wood but not as close to the wood as this is going to be.

- Bernie
 

Master Plumber Mark

Sensitivity trainer and plumber of mens souls
Messages
5,538
Reaction score
357
Points
83
Location
indianapolis indiana - land of the free, home of
Website
www.weilhammerplumbing.com
second hand smoke is ok

your letting the instructions fool you......

I HATE those kohler faucets ...most difficult to work with...


you can build that faucet up and solder it up

standing in mid -air out of the copper if you so choose
then add teh 2x4 backing later it you want too...
.....

its no big deal if you smoke up some 2x4s...

just have a handy spray bottle ready like shown in

my pic....


good luck
 
Last edited:

BS

Member
Messages
51
Reaction score
0
Points
6
Location
Central Ohio
Thanks, everyone.

Instructions should make life easy. Yet these create questions by leaving things out or contradicting themselves. Here's an example:

The Kohler instructions say, "The flat front surface of the plaster guard must be flush with the finished wall." The accompanying diagram shows the plaster guard flush with the finished wall with a dimension from the finished wall back to the valve labeled "2-3/4" -- 3-1/2" Rough-In Depth." If it's 2-3/4" it would be sticking out 3/4". If it's 3-1/2" it would be flush. What part of MUST BE FLUSH am I not understanding? :confused:

I think what Kohler really means is this: "The flat front surface of the plaster guard must be positioned at least flush with the finished wall but not more than 3/4" past it." At least that's the way I'm interpreting it.

It's also interesting that these details are given in the last step of the instructions. Meanwhile back in step 1 it says "Determine the location of the valve." I know it's important to read all the instructions first, and with instructions like these, that's why!

- Bernie
 

Chassis

Engineer
Messages
340
Reaction score
0
Points
16
Location
SE Pennsylvania
Bernie,

I share your pain. I have installed 2 shower valves, and they weren't straightforward by any means. Here is what I have learned.

Vertical height and left-right positioning is easy. Left-right should be centered to your tub. Vertical height you have some latitude, but needs to be such that the valve trim escutcheon does not interfere with the tub spout escutcheon. The Kohler rough-in guide is actually helpful here. Get a how-to book on bathrooms from Lowe's/HD and it will help.

In-out dimension is the hardest. I would shoot for flush to the finished wall relative to the plaster guard. Easy to say, hard to visualize and harder to explain. Take your time at it, and you'll figure it out.
 

BS

Member
Messages
51
Reaction score
0
Points
6
Location
Central Ohio
I Just Touched It!

Kohler confirmed my interpretation concerning the positioning of the valve, and the customer service rep was very helpful. "Must be flush" means the front face of the plaster guard has to extend beyond the finished wall 0 (flush) to 3/4 inch.

I took today off and replaced the shower valve. It turns out the shower riser was restricting much of the fore-and-aft movement of the existing valve. When I cut the riser, the valve and supply lines became free to move deeper into the wall. This allowed me to simply run the supply lines straight up to the valve. I connected one supply line to the valve using a street elbow (thanks for this tip, HJ: now I know what a street elbow is).

I ran into an unexpected problem when the hot water supply elbow connection below the floor came apart while I was moving the riser. :eek: I wasn't forcing it by any means -- just lightly moving the riser around to see how much play it had. The old joint lasted 28 years but the solder had penetrated into the joint only about 1/16 inch. I wound up cutting a hole in the ceiling in the downstairs bathroom (remodeled 3 years ago) so I could gain access from below to sweat on a new elbow. It's a good thing I learned how to repair a popcorn ceiling earlier this year because I now have to put that skill to use one more time.

And yes, the 2x4 support block got smoked (charred would be more descriptive).

Thank you to everyone for your help. You might be hearing from me again as I continue with the remodel. Should I continue with this thread or start a new one?

- Bernie
 

TedL

New Member
Messages
602
Reaction score
0
Points
0
Location
NY Capital District
BS said:
I ran into an unexpected problem when the hot water supply elbow connection below the floor came apart while I was moving the riser. :eek: I wasn't forcing it by any means -- just lightly moving the riser around to see how much play it had. The old joint lasted 28 years but the solder had penetrated into the joint only about 1/16 inch.

Much better to find this out when you did than at 2 am when someone flushes the toilet, the fill valve shuts off and the joint breaks. I'd consider myself lucky.
 

hj

Master Plumber
Messages
33,603
Reaction score
1,042
Points
113
Location
Cave Creek, Arizona
Website
www.terrylove.com
valve

You have to understand that the directions were probably written by someone who;
1. has never really installed one and is using logic to determine the necessary steps. or;
2. Has installed one, but did it in a laboratory where everything was arranged in a jig.
Install it using their dimensions, but do the steps in whichever order works best for you situation.
 
Top
Hey, wait a minute.

This is awkward, but...

It looks like you're using an ad blocker. We get it, but (1) terrylove.com can't live without ads, and (2) ad blockers can cause issues with videos and comments. If you'd like to support the site, please allow ads.

If any particular ad is your REASON for blocking ads, please let us know. We might be able to do something about it. Thanks.
I've Disabled AdBlock    No Thanks