Dfbecker
New Member
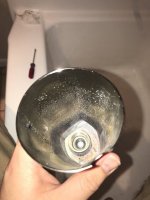
Hello there, novice plumber here. Thought it would be easy to replace the diverter faucet in my tub as it wasn't diverting much of the water to the shower head. The existing diverter was the screw-on type without any screw on the underside into the copper pipe. When I took a pipe wrench to unscrew it, the brute force applied to it actually caused the threaded part of the diverter to break off completely, leaving a ring of metal still screwed onto the copper.
Easy enough, I unscrewed that ring from the threads, cleaned off the old Teflon tape, and even used a Dremel to clean off the mineral buildup that was in the part of the copper threading that hadn't been used in the old diverter. It actually looks pretty clean now.
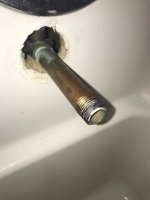
Bought a new diverter, a "universal" type from Home Depot. It threads onto the pipe and seems to be the appropriate length, but it will not thread all the way to the wall. I can put all of my elbow grease behind the pipe wrench to get it to keep turning and it just stops with just over 1/4 inch of space to the wall. Won't go any farther. And this is without the Teflon tape wrapped onto the pipe! I just wanted to make sure either will fit, and it does not. I can try a different branded universal diverter but in worried the same thing will happen. It does not seem like the diverter is allowing the pipe to thread all the way inside, but it's hard to tell. Kind of stuck now with an unusable shower! Any ideas?
Additionally, in the photo of the pipe you can see that the front end of the threading is darker. That was the part that was actually covered by the old diverter. It had not been threaded on beyond that point.
Easy enough, I unscrewed that ring from the threads, cleaned off the old Teflon tape, and even used a Dremel to clean off the mineral buildup that was in the part of the copper threading that hadn't been used in the old diverter. It actually looks pretty clean now.
Bought a new diverter, a "universal" type from Home Depot. It threads onto the pipe and seems to be the appropriate length, but it will not thread all the way to the wall. I can put all of my elbow grease behind the pipe wrench to get it to keep turning and it just stops with just over 1/4 inch of space to the wall. Won't go any farther. And this is without the Teflon tape wrapped onto the pipe! I just wanted to make sure either will fit, and it does not. I can try a different branded universal diverter but in worried the same thing will happen. It does not seem like the diverter is allowing the pipe to thread all the way inside, but it's hard to tell. Kind of stuck now with an unusable shower! Any ideas?
Additionally, in the photo of the pipe you can see that the front end of the threading is darker. That was the part that was actually covered by the old diverter. It had not been threaded on beyond that point.
Attachments
Last edited:
")