Help, please, regarding a floor mount rear outlet/discharge toilet.

Users who are viewing this thread

Sean493

New Member
Messages
11
Reaction score
0
Points
1
Location
MA
Hi everyone, I hope all is well! I was hoping to have your guidance on a plumbing related question.

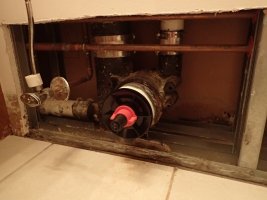
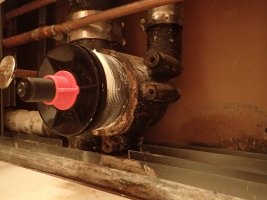
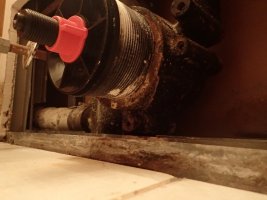
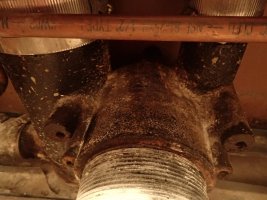
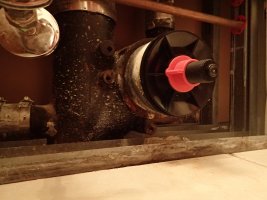
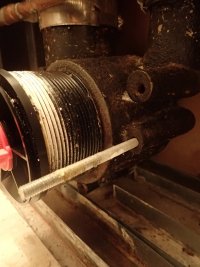
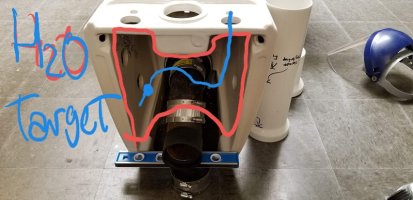
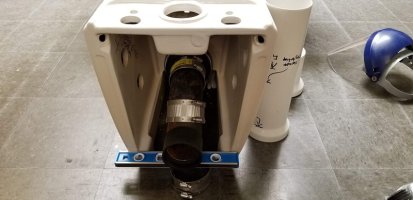
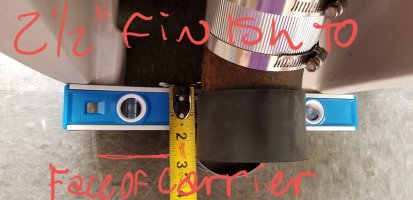
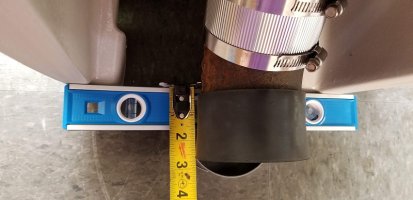
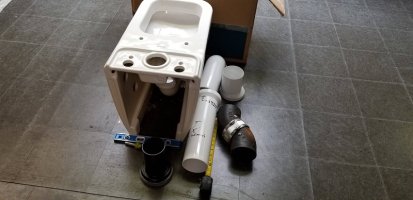
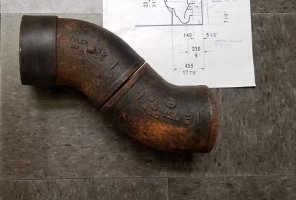
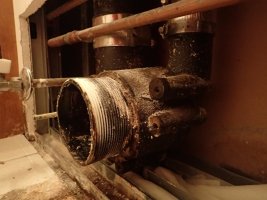
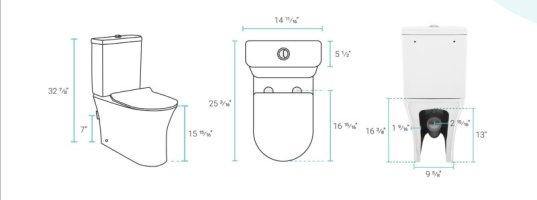
It's regarding a floor mounted rear outlet toilet and shifting the rough-in height. I currently have a Briggs 7340 installed (rough-in height of 4 1/4 inches above the floor/slab). The toilet I would like to install is a Swiss Madison Calice - SM-2T120 (rough-in height of 7 inches from the floor/slab). I was wondering if you could please provide any insight on how to install this new toilet in code-compliant way. I've heard of using a pan connector, but I can't find any in the US and am concerned about how it would work with the toilet's flange bolts/ toilet bowl gasket. I'm also attaching a drop box link to a folder showing pictures. The first link is of photos I found online and shows the Briggs toilet removed plus the drywall. The second is a picture I took showing the back side of the rear outlet drain.

Link 1 : https://www.dropbox.com/sh/r4a5aqmj7owlmvx/AAA5otut5wuf_ytQQ8Y8C8_ba?dl=0

Link 2 : https://www.dropbox.com/scl/fi/729o...ited.jpg?rlkey=99ioevpud75vw93gc4cd4di9e&dl=0

Thank you.
 
Last edited:

Jeff H Young

In the Trades
Messages
8,954
Reaction score
2,235
Points
113
Location
92346
The info is all messed up the instructions are foor a floor waste and the specs are for rear outlet . dont know what to tell you but dont expect a toilet with a 7 inch rough to work on a 4 1/4 . btw Im not clicking on those links it might be spam or some kind of hack
 

Sean493

New Member
Messages
11
Reaction score
0
Points
1
Location
MA
Hi Jeff, I initially thought it would be easier to view photos by attaching links, but I will also upload them here if it makes it easier. Sorry for the inconvenience. The reason why I asked if I can install a Swiss Madison Calice - SM-2T120 (rough-in height of 7 inches from the floor/slab), when my current rough in height is 4 1/4 inches is because my neighbor has this toilet (The Swiss Madison Calice - SM-2T120) installed on the same floor mount rear outlet/discharge toilet as I have. Knowing that, I did some research but reached a point that confuses me. I've heard of people using a wc flexi pan connector (picture attached) in this situation, but I can't find any in the US or any from a reputable plumbing supply here in the US and another fact I'm concerned about is how it would work with the rear outlet's flange bolts/ toilet bowl gasket. This leads me to believe that wc flexi pan connectors are not code-compliant in the US, but I could be wrong and wanted to clarify if there is there a code compliant way of connecting this toilet to my rear outlet system?
 

Attachments

  • swiss madison.JPG
    swiss madison.JPG
    19.6 KB · Views: 150
  • alcaplast-90110mm-toilet-elbow-flexi-waste-pan-connector-universal-range-plastic-flexible__41210.jpg
    alcaplast-90110mm-toilet-elbow-flexi-waste-pan-connector-universal-range-plastic-flexible__41210.jpg
    36.1 KB · Views: 152
  • pic-1.jpg
    pic-1.jpg
    80.9 KB · Views: 147
  • pic-2.jpg
    pic-2.jpg
    68.6 KB · Views: 147
  • pic-3.jpg
    pic-3.jpg
    76 KB · Views: 138
  • pic-4.jpg
    pic-4.jpg
    67.6 KB · Views: 131
  • pic-5.jpg
    pic-5.jpg
    91.9 KB · Views: 136
  • pic-6.jpg
    pic-6.jpg
    78 KB · Views: 139
  • pic-7.jpg
    pic-7.jpg
    82 KB · Views: 170

Jeff H Young

In the Trades
Messages
8,954
Reaction score
2,235
Points
113
Location
92346
Sorry I dont know how that toilet is installed and you have totally conflicting and or not enough info . when the instructions call it a floor waste you know the info is incorrect
 

Tuttles Revenge

In the Trades
Messages
4,205
Reaction score
1,459
Points
113
OK.. I've actually done what you're attempting to do and its really difficult unless you can bend cast iron.

I adapted a 4 bolt closet carrier to accept a european style floor mount rear discharge like you've shown. Those toilets require a unifit style adapter to be offset to the wall carrier. I accomplished this by knowing the exact heights I had to work with and the depth available. I cut down Two 45° cast iron no hub elbows to shorten their height and length. I connected that contraption to the wall carrier with a duravit toilet connector and the toilets slid right into place.
 

Tuttles Revenge

In the Trades
Messages
4,205
Reaction score
1,459
Points
113
Here are the photos of some of the work I put into making a European style floor mount rear discharge toilet fit to a 4 bolt wall carrier.
 

Attachments

  • 20180830_153818 (002).jpg
    20180830_153818 (002).jpg
    121 KB · Views: 159
  • 20180830_153659 (002).jpg
    20180830_153659 (002).jpg
    110.5 KB · Views: 145
  • 20180830_144502 (002).jpg
    20180830_144502 (002).jpg
    110.6 KB · Views: 145
  • 20180830_144353 (002).jpg
    20180830_144353 (002).jpg
    103.9 KB · Views: 134
  • 20180830_102201 (002).jpg
    20180830_102201 (002).jpg
    125.1 KB · Views: 130
  • 20180821_161134 (002).jpg
    20180821_161134 (002).jpg
    88.4 KB · Views: 143

Jeff H Young

In the Trades
Messages
8,954
Reaction score
2,235
Points
113
Location
92346
nice way to build that after all the head scratching probebly went together well. The water supply is buried in that space as well?
 

Tuttles Revenge

In the Trades
Messages
4,205
Reaction score
1,459
Points
113
nice way to build that after all the head scratching probebly went together well. The water supply is buried in that space as well?

Yeah, they turned out really nice. We installed shut off valves under the sink with a long "supply tube" that entered behind the toilet up to the tank. My original design was to have a shutoff in a recessed box next to the toilet like an ice maker box. But because the wall was a fire wall it became problematic. Of course I can't find any photos of the finished product.
 
Last edited:

Jeff H Young

In the Trades
Messages
8,954
Reaction score
2,235
Points
113
Location
92346
Yeah, they turned out really nice. We installed shut off valves under the sink with a long "supply tube" that entered behind the toilet up to the tank. My original design was to have a shutoff in a recessed box next to the toilet like an ice maker box. But because the wall was a fire wall it became problematic. Of course I can't find any photos of the finished product.
Nice plan and work !
 

Sean493

New Member
Messages
11
Reaction score
0
Points
1
Location
MA
Here are the photos of some of the work I put into making a European style floor mount rear discharge toilet fit to a 4 bolt wall carrier.
Hi Tuttles Revenge, thank you for your reply and pictures. I really appreciate the guidance.

I was just wondering instead of cast iron, could I potentially build this adapter with schedule 40 PVC DWV rated fittings?

To my understanding the Swiss Madison toilet trap size has a 3 inch diameter so I am thinking the following build might work:
- One 45° Elbow: 3 in x 3 in Fitting Pipe Size, Schedule 40, Female Socket x Female Socket (image attached below)
- One 3 in. PVC DWV 45-Degree Street Elbow (image attached below).
- Two 3 in Fernco neoprene shielded couplings
I would ensure my fittings meet the height and depth requirements of the Swiss Madison toilet by cutting them to size.

Next, and please correct me if i’m wrong, I would:
- No hub the Female Socket x Female Socket to the cast iron stack
- Prime and cement the other side of the double female socket fitting to the hub side of the second pvc fitting (the 45-Degree Street Elbow)
- Cut the black p trap outlet pipe that Swiss Madison provides (image below) to a shorter length so that the final contraption doesn’t protrude
- Connect the shortened p trap outlet pipe to the toilet’s porcelain discharge drain
- On the other side of the shortened p trap outlet pipe, connect the custom two-piece PVC 45 degree elbow adapter with a no hub coupling, which effectively attaches the toilet to the wall

My concerns / doubts:
- When using a no hub coupling from the pvc adapter to the cast iron stack, would I need a neoprene or rubber gasket like how normal toilets use wax rings?
- Additionally, would I still need to attach anything to the cast iron stack’s flange bolts? Would I need to build any support to keep the custom adapter in place?
 

Attachments

  • 45° Elbow- 3 in x 3 in Fitting Pipe Size, Schedule 40, Female Socket x Female Socket .jpg
    45° Elbow- 3 in x 3 in Fitting Pipe Size, Schedule 40, Female Socket x Female Socket .jpg
    18.3 KB · Views: 111
  • 3 in. PVC DWV 45-Degree Street Elbow.png
    3 in. PVC DWV 45-Degree Street Elbow.png
    70.6 KB · Views: 129
  • Screen Shot 2023-09-12 at 8.10.10 PM.png
    Screen Shot 2023-09-12 at 8.10.10 PM.png
    181.1 KB · Views: 127
  • p trap outlet pipe.png
    p trap outlet pipe.png
    81.7 KB · Views: 131
  • pic-1.jpg
    pic-1.jpg
    80.9 KB · Views: 126
  • swiss madison.JPG
    swiss madison.JPG
    19.6 KB · Views: 117
Last edited:

Tuttles Revenge

In the Trades
Messages
4,205
Reaction score
1,459
Points
113
When we did ours, we used the NoHub coupling to connect the 45° offsets with the connector directly to the carrier barrel. With those fairly solidly in place the toilet simply slid into place. The reason we used the cast iron fittings is because they are "Street" fittings on both ends.. meaning we could connect the adapters at each end of the fittings which you can't do with plastic DWV fittings. The space behind the toilet didn't have any room to spare in our scenario.. yours may allow for that additional 2 inches of space.

The adapter shown on the back of the toilet picture looks interesting. You would need a clamping closet flange to attach to the barrel to adapt that.
 

Sean493

New Member
Messages
11
Reaction score
0
Points
1
Location
MA
When we did ours, we used the NoHub coupling to connect the 45° offsets with the connector directly to the carrier barrel. With those fairly solidly in place the toilet simply slid into place. The reason we used the cast iron fittings is because they are "Street" fittings on both ends.. meaning we could connect the adapters at each end of the fittings which you can't do with plastic DWV fittings. The space behind the toilet didn't have any room to spare in our scenario.. yours may allow for that additional 2 inches of space.

The adapter shown on the back of the toilet picture looks interesting. You would need a clamping closet flange to attach to the barrel to adapt that.
Hi, Thanks for the reply and the explanation. I was just wondering if you had link or a picture of this clamping closet flange. I am aware of regular closet flanges, just not the clamping ones. Additionally, if I go the cast iron route, which tool(s) did you use to shorten the 45° offsets?
 

Tuttles Revenge

In the Trades
Messages
4,205
Reaction score
1,459
Points
113
This is 1 example of a cast iron clamping closet flange that would go on the outside of your drain barrel

I cut the cast iron 45's with an angle grinder using a diamond blade. I unfortunately don't have pictures of that process. But it essentially emulates what that fitting in the back of the toilet photo is doing.
 
Top
Hey, wait a minute.

This is awkward, but...

It looks like you're using an ad blocker. We get it, but (1) terrylove.com can't live without ads, and (2) ad blockers can cause issues with videos and comments. If you'd like to support the site, please allow ads.

If any particular ad is your REASON for blocking ads, please let us know. We might be able to do something about it. Thanks.
I've Disabled AdBlock    No Thanks