Lemmy
Member
As noted in another thread, I paid some people to do some work and they did a less than stellar job, I made a separate thread since this is more concerned with the tub installation. I apologize if it would have been better to have them in the same thread.
We have a Mansfield AVA 5732
https://www.mansfieldplumbing.com/product-catalog/ava/
The installation document says the tub shell CANNOT rest on the floor. It is supposed to rest on the adjustable leveling legs. Also, it mentions using silicone sealant on the bottom of the tub to adhere it to the floor.
Here is the installation document:
https://www.mansfieldplumbing.com/w...04/Whitley-Collection-Freestanding-manual.pdf
This tub has the drain in the center and it is a rigid drain that goes straight down through the floor. I have seen some that use a flexible line to make installation a bit easier.
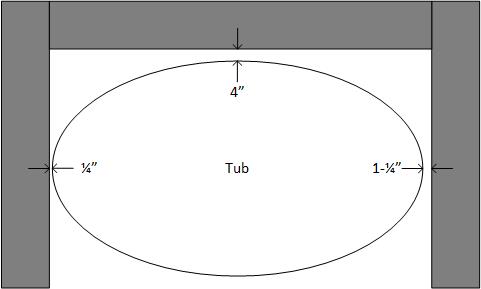
The guys that installed it didn't use the leveling legs at all. So the tub shell rests on the floor and of course the tub rocks a little. When they connected the drain to the trap in the crawlspace they glued it all so I will need to cut the drain line from below and remove the tub to adjust the leveling legs (need a final gap of at least 1/8" between the tub shell and the floor). Also as shown in the attached drawing, the tub isn't centered so I will need to make the hole in a floor for the drain just a bit larger to allow the tub to move the right. As it is, the drain line is hitting the edge of the hole that was cut for it.
My question is concerning the sealant on the bottom of the tub. Once I get the legs adjusted properly, I don't see how I could get sealant on the bottom of the tub then get it flipped over and installed on the floor without making a mess on he floor with the sealant. Since it is in an alcove I can't easily have it lifted up on each and and then sit it straight down in to place. I am not sure if sealing it to the floor is to keep the tub from moving or to keep water from getting under the tub. I thought about installing the tub then running a bead of silicone caulk around the base, but the back and sides might be a bit difficult to reach. What is typically done for a freestanding tub in an alcove? Thanks.
We have a Mansfield AVA 5732
https://www.mansfieldplumbing.com/product-catalog/ava/
The installation document says the tub shell CANNOT rest on the floor. It is supposed to rest on the adjustable leveling legs. Also, it mentions using silicone sealant on the bottom of the tub to adhere it to the floor.
Here is the installation document:
https://www.mansfieldplumbing.com/w...04/Whitley-Collection-Freestanding-manual.pdf
This tub has the drain in the center and it is a rigid drain that goes straight down through the floor. I have seen some that use a flexible line to make installation a bit easier.
The guys that installed it didn't use the leveling legs at all. So the tub shell rests on the floor and of course the tub rocks a little. When they connected the drain to the trap in the crawlspace they glued it all so I will need to cut the drain line from below and remove the tub to adjust the leveling legs (need a final gap of at least 1/8" between the tub shell and the floor). Also as shown in the attached drawing, the tub isn't centered so I will need to make the hole in a floor for the drain just a bit larger to allow the tub to move the right. As it is, the drain line is hitting the edge of the hole that was cut for it.
My question is concerning the sealant on the bottom of the tub. Once I get the legs adjusted properly, I don't see how I could get sealant on the bottom of the tub then get it flipped over and installed on the floor without making a mess on he floor with the sealant. Since it is in an alcove I can't easily have it lifted up on each and and then sit it straight down in to place. I am not sure if sealing it to the floor is to keep the tub from moving or to keep water from getting under the tub. I thought about installing the tub then running a bead of silicone caulk around the base, but the back and sides might be a bit difficult to reach. What is typically done for a freestanding tub in an alcove? Thanks.