Help - converting 2 pc basement rough-in to a 3 pc.

Users who are viewing this thread

Aprofetto

New Member
Messages
17
Reaction score
0
Points
0
Location
Grimsby, Ontario
Hi everyone,
I'm new to the forums, so first off allow me to say hello. Secondly, I consider myself a bit of a handyman, so please keep that in mind when helping me with the below questions. :)

My brother and I just bought a rental house and will be putting a bedroom and bathroom in the basement. There is currently a 2 pc rough in for toilet and sink down stairs, and I would like to convert it into a 3 pc so I can also install a shower down there.

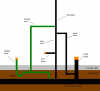
So, currently there is a sink drain and toilet drain, both attached to the vent stack (I believe thats what it's called). I am prepared to break concrete and attach a shower drain to the main drain that runs out to the street.

At this point, please refer to my diagram that I've attached and let me know if my setup is okay? The green piping is what I'll be adding, the black piping is existing.

Once that makes sense, my next question is the part I'm really unsure about.

I've done my fair share of plumbing, but I've never actually 'tapped' into an existing line, and I'm unsure how to do it? First off, to connect to the main drain, do I use a san tee? Or a wye fitting? Secondly, how exactly do I go about cutting and installing one of these fittings? It's not like I can just glue each side of the fitting and put it on as the drain will have relatively zero give, correct?

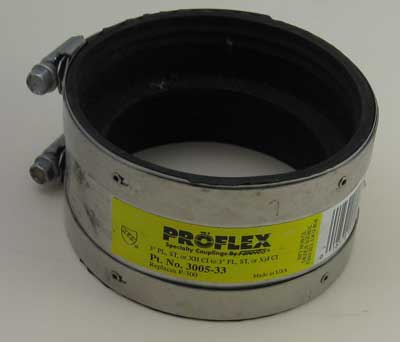
I read something about Fernco fittings, but I'm really unsure. Any help you guys can offer would be greatly appreciated!

Please let me know if anything I've mentioned is incorrect. Thanks!
 

Attachments

  • BasementPlumbing.PNG
    BasementPlumbing.PNG
    11.7 KB · Views: 5,622

Shacko

Master Plumber-Gas Fitter
Messages
559
Reaction score
1
Points
0
Location
Rosedale, Md
What you show is o.k., the under slab pipe to the shower has to be 2in, vent off the shower can be 1 1/2in. Fernco's are the way to go cutting into your main pipe.

proflex_33.jpg
 
Last edited by a moderator:

Dlarrivee

New Member
Messages
1,150
Reaction score
0
Points
0
Location
Canada
First off, to connect to the main drain, do I use a san tee? Or a wye fitting? Secondly, how exactly do I go about cutting and installing one of these fittings? It's not like I can just glue each side of the fitting and put it on as the drain will have relatively zero give, correct?

You'll want to use a wye.

Santees are for drains going from horizontal into a stack, not for laying on their backs or sides.
 

Cacher_Chick

Test, Don't Guess!
Messages
5,458
Reaction score
213
Points
63
Location
Land of Cheese
This is all assuming that your vent stack has no fixtures draining into it on the floors above. If it does, you cannot use it as drawn.
 

Dlarrivee

New Member
Messages
1,150
Reaction score
0
Points
0
Location
Canada
With any luck the original bathroom was done properly, is everything in black done already or is there just stub outs in the floor now?
 

Aprofetto

New Member
Messages
17
Reaction score
0
Points
0
Location
Grimsby, Ontario
Wow, thanks for all the help guys!

You'll want to use a wye.

Santees are for drains going from horizontal into a stack, not for laying on their backs or sides

I remember reading somewhere that if you're ever installing a santee on it's 'back' to say 'Y God, Y?', so I guess its a wye fitting I need.

In terms of the wye fitting attaching to the main drain, I will attach it using those Fernco fittings, correct? Now, the shower drain pipe, should it connect with the wye on the side of the main drain, or from the top, in other words, should the wye pipe be laying on it's back when its installed?

With any luck the original bathroom was done properly, is everything in black done already or is there just stub outs in the floor now?

This is all assuming that your vent stack has no fixtures draining into it on the floors above. If it does, you cannot use it as drawn.

In the picture I provided, everything in black currently exists, I can only assume that the vent stack has no fixtures draining from above, so I will try and investigate further. What you see in black was done by the builder when the house was built.
 

Randyj

Master Plumber
Messages
1,060
Reaction score
2
Points
36
Location
Alabama
If you want to stay away from the rubber couplings you can use a repair coupling which is no different from a regular coupling except that it does not have a stop in the middle and does not have the slightly narrowing sides. Trick to them is to mark the pipe so you will know where it is supposed to be when you get it in place... and making sure you have glue in the joints after you push the glue off the pipe when sliding it into position.
 

Aprofetto

New Member
Messages
17
Reaction score
0
Points
0
Location
Grimsby, Ontario
If you want to stay away from the rubber couplings you can use a repair coupling which is no different from a regular coupling except that it does not have a stop in the middle and does not have the slightly narrowing sides. Trick to them is to mark the pipe so you will know where it is supposed to be when you get it in place... and making sure you have glue in the joints after you push the glue off the pipe when sliding it into position.

I am comfortable using either type of coupling. Is there one preferred over the other?

I actually wondered if these type of repair couplings existed. My only worry would be the glue on the side which you have to slide the coupling towards.
 

Randyj

Master Plumber
Messages
1,060
Reaction score
2
Points
36
Location
Alabama
I was educated to use glue like my daddy owns the company... so I put plenty of glue on fitting AND pipe. When using a repair coupling I slide it a little too far then add a little glue on the pipe I slid it from, then slide it back into position. A sharpie comes in great for marking positions of fittings.
As for using a Fernco(rubber) v.s. a repair coupling it's mostly a personal preference. I've had problems in the past where a big gap was covered by a Fernco which resulted in catching toilet paper then more trash builds up behind that resulting in a clogged line. So.. no matter what kind of coupling I use I try to keep this gap where the pipe joins to a very minimum. The rubber is more likely to allow the pipes to shift out of alignment, especially if they have a big space between them.

proflex.jpg
 
Last edited by a moderator:

Aprofetto

New Member
Messages
17
Reaction score
0
Points
0
Location
Grimsby, Ontario
I was educated to use glue like my daddy owns the company... so I put plenty of glue on fitting AND pipe. When using a repair coupling I slide it a little too far then add a little glue on the pipe I slid it from, then slide it back into position. A sharpie comes in great for marking positions of fittings.
As for using a Fernco(rubber) v.s. a repair coupling it's mostly a personal preference. I've had problems in the past where a big gap was covered by a Fernco which resulted in catching toilet paper then more trash builds up behind that resulting in a clogged line. So.. no matter what kind of coupling I use I try to keep this gap where the pipe joins to a very minimum. The rubber is more likely to allow the pipes to shift out of alignment, especially if they have a big space between them.

Cool, I will definitely keep both options in mind, thanks Randy.
 

Dlarrivee

New Member
Messages
1,150
Reaction score
0
Points
0
Location
Canada
Make sure to try running every faucet up stairs and ensuring that line isn't a drain for anything, if it is indeed a vent then you're already 3 steps ahead.
 

hj

Master Plumber
Messages
33,603
Reaction score
1,042
Points
113
Location
Cave Creek, Arizona
Website
www.terrylove.com
If you try to use a repair coupling, remember that everything MUST be lined up properly before you start because you may only have a few seconds to position the coupling in the right spot before it bonds to the pipe.
 

Dlarrivee

New Member
Messages
1,150
Reaction score
0
Points
0
Location
Canada
If you try to use a repair coupling, remember that everything MUST be lined up properly before you start because you may only have a few seconds to position the coupling in the right spot before it bonds to the pipe.

This is the biggest reason to go with the rubber coupling, I've had a few instances where I didn't have quite enough room and had to move very quickly to prevent my fitting from bonding to the pipe at an odd angle vs. straight on...
 
Top
Hey, wait a minute.

This is awkward, but...

It looks like you're using an ad blocker. We get it, but (1) terrylove.com can't live without ads, and (2) ad blockers can cause issues with videos and comments. If you'd like to support the site, please allow ads.

If any particular ad is your REASON for blocking ads, please let us know. We might be able to do something about it. Thanks.
I've Disabled AdBlock    No Thanks