Moving Basement Shower Drain

Users who are viewing this thread

GoldMaple

DIY Junior Member
Messages
44
Reaction score
0
Points
6
Location
Edmonton, Alberta
First, a little background on my project! I have an existing basement bathroom. It has a sink, toilet, and a shower. I believe the plumbing was done to code many many years ago and everything works. I remodeled the rest of my basement about 5 years ago and had to pull the old shower stall out but left the the toilet and sink in working order. I'm now ready to redo the bathroom and I'm going to start with the shower.

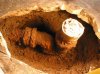
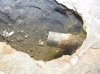
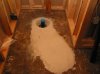
My issue is very similar to a past poster of this forum in that I need to move the shower drain about 2 feet from it's existing location. The old shower drain is about 4 inches in diameter at the concrete but it quickly narrows to about 2 inches. The drain drops down about a foot and a half then veers off towards the toilet. In the 5 years that the drain has been open I have only smelled sewer gas in my basement a few times. Every time I've smelled sewer gas I have filled a bucket with water and poured a gallon or so in the few floor drains I have. (I have 2 other open drains in the basement) Then the smell goes away. So, I think that the existing floor drain has a proper trap and it's just a matter of getting the drain situated in the new location.

Given that I have a few questions:

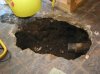
1. What is the easiest method to break the concrete so I can run the pipe fromthe existing drain to the new drain location? I'll rent the tools and do it myself.

2. How do I connect the new pipe to the existing drain? I think the existing drain is cast iron.

3. Should the new drain be as wide as the current drain or should I just use a 2 inch pipe?

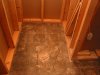
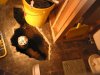
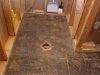
This picture pretty much sums up what I have to do. That is, position the new drain about 2 feet away from the existing drain and then connect the new pipe to the old drain. I would like to do this right way so any feedback would be much appreciated. Thanks!
 

Attachments

  • IMG_0024.jpg
    IMG_0024.jpg
    49.6 KB · Views: 14,474
Last edited:

Jadnashua

Retired Defense Industry Engineer xxx
Messages
32,770
Reaction score
1,190
Points
113
Location
New England
Underground, you can use a Fernco coupling to attach the new ABS to the cast iron that you'll have to cut. There are several ways to do that: saw, grinder, snap cutter.

You want the trap riser directly under the new shower drain. It depends on what kind of a shower you are going to do where that drain goes. Make sure you get the trap arm aligned with the rest of the drain and maintain the 1/4" per foot slope of the horizontal section.

Once you get the plumbing straight, if you are going to tile it, check out www.johnbridge.com for help in constructing the shower properly. The specific type of drain you use will depend on the method you use to build the shower.
 

GoldMaple

DIY Junior Member
Messages
44
Reaction score
0
Points
6
Location
Edmonton, Alberta
More investigating

Okay, so I'll have to move the P-Trap. Since the current drain isn't used it was dry so I just poured a gallon of water down it. A water line was created about 1/3 up the pipe so there is an existing P-Trap. I thought there was but didn't know where it would be located.

I was thinking I could just tie into the existing drain and use it's P-Trap but it appears that is not going to cut it. So, I'll cut the concrete from where I need the drain all the way around the existing drain, bust out the concrete and then cut the existing pipe just past the P-Trap. Then I'll put the new P-trap under the new drain and tie into the existing pipe using a Fernco Coupling. Does that sound right?

Also, the bathroom has a vent but I don't think that the existing shower drain was vented. How can you tell? I pour water in the drain and it stays there, at least until it evaporates over a long period of time.

Thanks.
 

Jadnashua

Retired Defense Industry Engineer xxx
Messages
32,770
Reaction score
1,190
Points
113
Location
New England
There should be a vent, and after you tear up the floor some, you may find it.

If it isn't vented, what can happen is when water flows from other fixtures, it can suck the water out of the trap that isn't vented, leaving that open to the sewer.

If you have someone pour water down other fixtures, does the water move in the existing trap?
 

GoldMaple

DIY Junior Member
Messages
44
Reaction score
0
Points
6
Location
Edmonton, Alberta
Water Down the other fixtures

Okay, so I turned on full both taps at the sink and the water in the shower drain did not move at all. I then flushed the toilet and the water in the shower drain moved but it was barely perceptible and only lasted for a few seconds. The toilet is 36 inches from the shower drain and I'd like to move the drain about 16 to 24 more inches away. Not sure if the distance matters.
 

GoldMaple

DIY Junior Member
Messages
44
Reaction score
0
Points
6
Location
Edmonton, Alberta
Vent Question

Another question... Can I connect a new vent to an existing vent? In my basement bathroom there is definately one vent for the sink but I'm not sure if the toilet and shower drain are already connected to it. Might be but I can't see under the concrete

Also, the vent from the tub upstairs is very conveniently located for connecting to from a new basement shower vent. So, I'm thinking if the basement shower is not vented I would connect to the upstairs tub vent. Would that be okay?
 

hj

Master Plumber
Messages
33,603
Reaction score
1,042
Points
113
Location
Cave Creek, Arizona
Website
www.terrylove.com
vent

The shower drain could be connected at the same point as the toilet, so it would not need its own vent in that case. No way to tell without some investigation. But that could only happen if the shower drain were 2" all the way to the connection.
 

GoldMaple

DIY Junior Member
Messages
44
Reaction score
0
Points
6
Location
Edmonton, Alberta
A Little Further Along

Okay, so I busted out the concrete to see what I am dealing with. These are the steps I took;

1. Purchased a Bosch diamond concrete cutting blade for my 7 1\2 inch circular saw and then scored the area I wanted to cut out. In this step I also bought some poly and sealed off the area because the dust created needs to be contained. Further, I had my shop vac inside the sealed area to suck the concrete dust as it flew. I positioned the vac hose right at the front of the saw where the dust was being created. This helped keep the dust down a lot and I HIGHLY recommend it. Finally, I wore safety glasses and had hearing protection. The rest was just a joy! :)

2. I cleaned up the mess and the next day I busted out the concrete with a hand sledge, a full sledgehammer and a cold chisel. This step was fairly easy.

3. I then used a garden hand shovel and dug out around the existing drain fixture.

Here's what it looked like..........
 

Attachments

  • IMG_0032.jpg
    IMG_0032.jpg
    45.8 KB · Views: 8,723
  • IMG_0040.jpg
    IMG_0040.jpg
    59.9 KB · Views: 8,694
  • IMG_0056.jpg
    IMG_0056.jpg
    59.1 KB · Views: 8,741

GoldMaple

DIY Junior Member
Messages
44
Reaction score
0
Points
6
Location
Edmonton, Alberta
Next Step

Now that I have the existing drain exposed I need advice as to how to remove the old P-Trap and then conect the new PVC pipe to it? My first thought is to get a grinder with a cutting wheel and cut the pipe. However, just exactly where should I do it? Also, once I have removed the old P-Trap how do I connect the new PVC to it? Are there special adapters for this job? If so, which one should I use? Thanks!
 

Attachments

  • IMG_0055Resize.jpg
    IMG_0055Resize.jpg
    64.3 KB · Views: 9,315

Jadnashua

Retired Defense Industry Engineer xxx
Messages
32,770
Reaction score
1,190
Points
113
Location
New England
Cut the cast iron to the left of the fittings where it is a 'normal' diameter, not thicker like in the hub. You can grind it with a cutting wheel, or make quick work of it with a snap cutter (you'd have to rent one). Renting one may be cheaper as you may go through a couple wheels to cut through.

Wire brush the pipe to get all of the crud of, then use a Fernco coupler to make the connection. This is essentially a thick neoprene rubber sleeve with SS hose clamps at either end. That's a brand name, sort of like Kleenex...other companies make them as well. Backfill carefully around the pipe to support it and keep the ends aligned.
 

GoldMaple

DIY Junior Member
Messages
44
Reaction score
0
Points
6
Location
Edmonton, Alberta
Floor Drain and Other Questions

I've decided to build a tile shower stall and use the Schluter Shower System. So, I have a few more questions;

  • My existing cement floor had tile on it and it was removed (see pictures above). There is still black glue on the floor. Will mortar bond to this when I place the Kerdi Shower Tray on it?

    • If not, do I have to scrape it off down to the concrete or is there a bonding agent that can be used?

      • If required, what is the best method to scrape the glue off or what bonding agent could be used?
  • I haven't cut off the old cast iron P-Trap yet but when I do I'll attach the new PVC pipe to it and run it to the location of my new Kerdi drain. The Kerdi drain needs a wider opening in the concrete to accomodate it's size. (see http://www.johnbridge.com/vbulletin/showthread.php?t=28637) Can anyone off advice for;

    • Creating this drain opening when I pour the concrete?

    • Getting the drain level and keeping it there while pouring the concrete?

    • Anything else I should be aware of?
Thanks.
 

GoldMaple

DIY Junior Member
Messages
44
Reaction score
0
Points
6
Location
Edmonton, Alberta
Moving on

So, I cut my old P-trap off. I used a small Makita grinder with at cutting wheel and it didn't take too long. I then cleaned up the end with a scraper and put on a temporary plug. As soon as I decide exactly where the drain is going to go I'll attach the new ABS pipe and P-trap.

I'm going to continue this thread at the John Bridge site. This forum has answered all my plumbing questions and I'm now more focused on the rest of the shower. When I start that new thread I'll post a link here so if anyone is interested they can follow my progress over there. Thanks!
 

Attachments

  • IMG_0064Resize.jpg
    IMG_0064Resize.jpg
    43.1 KB · Views: 8,398
  • IMG_0063Resize.jpg
    IMG_0063Resize.jpg
    54 KB · Views: 8,593
  • IMG_0069Resize.jpg
    IMG_0069Resize.jpg
    45.9 KB · Views: 8,418

GoldMaple

DIY Junior Member
Messages
44
Reaction score
0
Points
6
Location
Edmonton, Alberta
Drain In

I finally put the drain in. The job was a little tricky given I wanted the riser coming off the P-trap to be perfectly plumb so the Kerdi Drain I stick on top will be level. Further, getting the proper slope on the pipe at the same time had me thinking about it for a while. Not sure how a pro does it but this was the approach I took. First thing I did was tape a piece of cardboard to the floor and mark exactly where I wanted the drain. I then hung a makeshift plumb bob to the mark. Last thing was to very carefully measure the pipe, taking into consideration the grade, and one by one glued it all together. Worked out great! I tested it with gallons of water, etc, and it's all good. See pics below.

Also, here is the link to the follow up thread on John Bridge's forum. http://www.johnbridge.com/vbulletin/showthread.php?t=76234

I'll no doubt be back for more advice as I still have to move the water lines. Cheers!
 

Attachments

  • IMG_0090Resize.jpg
    IMG_0090Resize.jpg
    41.3 KB · Views: 8,358
  • IMG_0100Resize.jpg
    IMG_0100Resize.jpg
    54.6 KB · Views: 16,094

wamba45

New Member
Messages
1
Reaction score
0
Points
0
Nice work

Good work, Gold Maple - I (a DIY in plumbing) benefitted from following this thread and the awesome photos. Thanks and good luck in your next phase.
 

GoldMaple

DIY Junior Member
Messages
44
Reaction score
0
Points
6
Location
Edmonton, Alberta
Update

Hey guys...Thanks for compliments, put a smile on my face :)

I've made a few strides since I last posted. Before I filled the hole with the sand and gravel I drilled nine 1/2 inch diameter holes, 3 inches deep into the sides of the concrete for the rebar. This can be difficult. The hammer drill went throught the concrete with relative ease but when it hit a rock it slowed dramatically. Very slow going through the rocks, and there were many. After a while I started inserting a punch in the hole and whacking it with my hand sledge. I think this cracked the rocks because I was able to proceed again, at least till I hit another rock. Anyway, it took several hours just to drill 9 holes......

Once done I cut the rebars with my little 5 inch grinder and then inserted them in the holes. I then placed the vapour barrier and also put a 4 inch piece of ABS around the drain. This is a trick I learned from CX on the John Bridge site. I'm doing a Kerdi Drain so one needs to leave room for the drain to get below the concrete. About an hour after I poured the concrete I carved into the concrete with a brick laying trowel just around the drain while the ABS was still in embedded. (See pics) I then pulled the ABS out. I know the Kerdi Drain will fit nicely in the whole and when I build my dry pack mortar bed I'll fill in under the drain.

Once all this was done I covered the wet concrete with some poly to keep the moisture in. Best not to rush the drying so you avoid cracks. The poly was on for about 5 days. I also used a crack resitant concrete that had fibres mixed in. For the amount of concrete I used the price was meaningless.

I mixed all the cement in a 35 litre plastic storage bin. Not the greatest but it fit in the bathroom and it did work. Mixing was hard work but who said this was going to be easy? I cleaned it out in my backyard and I could use for storage because I cleaned it before the cement dried. Cement is interesting. I so wanted to add more water while mixing (I didn't) because it seemed so dry. However, once in the hole it magically had enough water.......

Now I can move on to other things.......
 

Attachments

  • IMG_0112Resize.jpg
    IMG_0112Resize.jpg
    42.2 KB · Views: 3,421
  • IMG_0117Resize.jpg
    IMG_0117Resize.jpg
    36.3 KB · Views: 3,392
  • IMG_0136Resize.jpg
    IMG_0136Resize.jpg
    35.5 KB · Views: 3,362
Last edited:

Iminaquagmire

DIY Senior Member
Messages
206
Reaction score
0
Points
0
Looks good. I'd suggest a diamond cup grinder to scarify the concrete and get all that old adhesive up next.
 

GoldMaple

DIY Junior Member
Messages
44
Reaction score
0
Points
6
Location
Edmonton, Alberta
Glue.....

Yes, the glue....I've already had one round with the glue. I spent quite a few miserable hours scraping it off the entire bathroom floor with a 4 inch Richard's scraper. I went through quite a few blades and what is left now is the glue stain. There are no more pieces to scrape off. The only way to get the stain off would be to scarify, as you have suggested. I was hoping to avoid this given the effort I have already put in. Scraping that glue off is no fun. I know that there are thinsets that are advertised to be used over cutback. Has anyone used any of them and do they work?
 

GoldMaple

DIY Junior Member
Messages
44
Reaction score
0
Points
6
Location
Edmonton, Alberta
On to Plumbing now......

I've started plumbing in my bathroom. As it turns out I have to replace all of it because what was behind the walls was kind of a joke! :eek: Anyway, I've bought a 1700 series Delta valve and a hand held shower on a slide rail. I've decided to place the shower elbow below the valve and since the shower is only going to have the one fixture I'm going to plug one of the valve outlets. Since the shower elbow is below the valve I was considering plugging the top valve, which is normally used for the shower, and using the tub outlet for the shower elbow. So, is this cool? The tub outlet is larger so would that mean there will be more pressure at my shower head?

Also, why does the valve have the black plastic bracket around it? Does it serve any purpose?
 

Attachments

  • R10000-UNWS.jpg
    R10000-UNWS.jpg
    6.5 KB · Views: 3,167

John Bridge

Mudmeister
Messages
49
Reaction score
0
Points
0
Location
Houston, Texas
Website
johnbridge.com
Hi, I don't know your name. :)

Thanks to the folks who have referred our site for tiling information. We refer folks here all the time for their plumbing needs.

Either outlet in the Delta valve will work, whichever is easiest to plumb to your hand shower. I usually locate the outlet below and to the side of the valve.

The black plastic is both a template and a protector. Usually the front of the plastic is flush with the projected "finish" wall, in your case, the surface of the tile.
 

hj

Master Plumber
Messages
33,603
Reaction score
1,042
Points
113
Location
Cave Creek, Arizona
Website
www.terrylove.com
Delta

Also either insert the Delta control cartridge or the small black "bypass plug" after you install the valve or you will have massive problems with your hot water delivery.
 
Top
Hey, wait a minute.

This is awkward, but...

It looks like you're using an ad blocker. We get it, but (1) terrylove.com can't live without ads, and (2) ad blockers can cause issues with videos and comments. If you'd like to support the site, please allow ads.

If any particular ad is your REASON for blocking ads, please let us know. We might be able to do something about it. Thanks.
I've Disabled AdBlock    No Thanks