View Full Version : Nail thru pipe
boulder_deb
04-19-2009, 03:56 PM
While putting up crown molding, I've managed to nail thru the cold water supply line (to an upstairs bath - not the one being remodeled on the first floor). The hole is through one side of the pipe approximately an inch below the header. It seems that this is going to be a challenging spot to remove the section of the pipe with the hole to replace it. How do you guys deal with this?
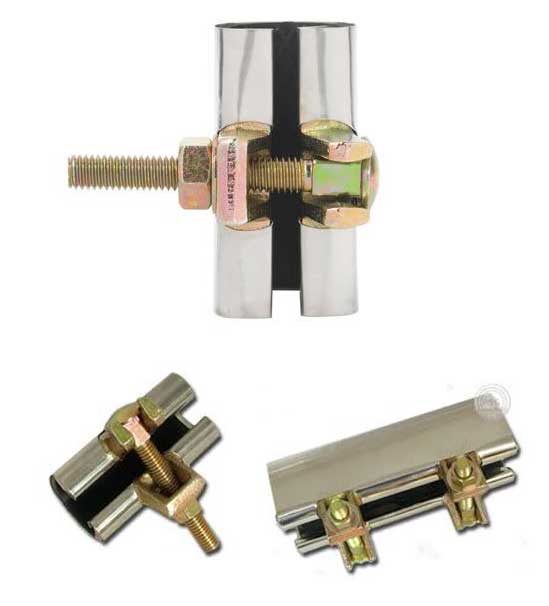
Is there any suitable "patch" for long term?
Any advice would be very much appreciated.
Thanks in advance,
Deb
SewerRatz
04-19-2009, 04:09 PM
No patch, need to open the wall cut out the peice with the hole and replace it.
Redwood
04-19-2009, 04:17 PM
It depends Deb some times we just cut the pipe on the hole and use safety items such as cool gel and flame protector cloth. Other times we cut the pipe well away from the damaged spot and sweat it in safer locations.
boulder_deb
04-19-2009, 04:27 PM
OK - thanks - that's sort of what I figured, but was hoping to hear something else. Sounds like a job for a professional - or risk burning down the house!
Thanks for the quick replies!
SewerRatz
04-19-2009, 04:31 PM
Some might tell you to go ahead and use a sharkbite. They make a coupling that you can use. They do make a slip coupling http://www.cashacme.com/prod_sharkbite_slip_coupling.php, I am just unsure about using them inside a wall myself.
http://i7.photobucket.com/albums/y292/SewerRatz/slip_coupling.jpg
Redwood
04-19-2009, 04:34 PM
They are rated for inside walls but they must slip over the pipe a full inch.
A good plumber may just cut it and use a repair coupling but I can't say for sure without seeing it and knowing the persons sweating skills.
boulder_deb
04-19-2009, 04:59 PM
Here's the bad boy... and the itty bitty hole in the wall I made around it (trying to save the new texture if possible).
http://www.longmontsculling.com/TikiWiki/show_image.php?name=pipe_hole.jpg
I had a plumbing instructor who had a trick of drilling a small hole in copper tubing to drain water on a stubborn joint and would subsequently just sweat the hole afterwards ... is it a 15, 16 or 18 guage brad ... sweating may be an option. Just thinking outside the box.
SewerRatz
04-19-2009, 05:06 PM
Ish thats in a tight spot. Best to get a pro in to handle that if you are not familiar with soldering in a wall against a joist like that.
Here's the bad boy... and the itty bitty hole in the wall I made around it (trying to save the new texture if possible).
http://www.longmontsculling.com/TikiWiki/show_image.php?name=pipe_hole.jpg
Funny story ... I had a friend that did the exact same thing. Only problem was he was befuddled at what happened and couldn't believe it (no leaks) until he had the bright idea of pulling out the brad and all hell broke loose (lol)
boulder_deb
04-19-2009, 06:01 PM
That's pretty much what happened with me, 99. I actually feel lucky that I'm a rookie at crown molding too, and had to take the piece down - otherwise I never would have known until a long, and expensive time later. All hell did break loose as soon as I pulled out the nail - amazing how much squirted out as I ran to turn off the water supply!
All my previous plumbing/sweating has been in new construction - so I've had no walls to deal with before. I'll be calling someone in the morning. You guys know anyone good in the Boulder, CO area?
kordts
04-19-2009, 06:06 PM
I have cleaned the pipe and soldered over holes like that. Brazing would be better.
gardner
04-19-2009, 06:50 PM
I am not a pro by any means and this is not advice...
but you might be able to fashion a patch out of a short section of 1/2 tubing or a 1/2 fitting hub, cut in half. Clean the pipe and dress the inside of the patch so it fits tight to the pipe. Flux it up and sweat. Use a stainless steel pipe clamp to hold it all together while you solder.
This is only slightly less fuss than cutting the pipe and installing a repair coupling.
SewerRatz
04-19-2009, 07:10 PM
Soldering over the hole, cutting a piece of pipe in half and soldering it over the hole is not the proper or right way to ensure a good quality repair. Heck she could just go out and get some pro Poxy and mix some up and push it in there, or even get a pipe clamp of the right size like the one pictured below. Still is not the right way to fix this.
I would open the wall on both sides of that board the copper pipe is passing through, cut the pipe about 3 " to both sides of the board. Cut a new piece of pipe to length pas it through the hole in the board and two solder couplings. Now the flame is no where near the wood, its a proper repair that no one has to worry if it might let loose some time later. Remember with plumbing you want to do it right the first time.
http://i7.photobucket.com/albums/y292/SewerRatz/Plumbing%20pics/bolt-clamps.jpg
boulder_deb
04-19-2009, 07:47 PM
Thanks again - when the pro's come tomorrow, at least I'll know what to look for in a good versus a cobbled together repair. I do want to make sure that I don't have to open up the wall after the remodel is done. I'll be sure to let you know how it all turns out.
So how do you know where the pipes are so I don't do this on another wall? Maybe the answer is simply to use shorter nails so they don't go so far thru the drywall.
ChuckS
04-19-2009, 11:02 PM
Just stick a lead pencil into the hole then break off the tip. After that, wrap it in duct tape until it stops leaking.
No homeowner should ever be without duct tape.
Redwood
04-19-2009, 11:22 PM
Just stick a lead pencil into the hole then break off the tip. After that, wrap it in duct tape until it stops leaking.
No homeowner should ever be without duct tape.
You forgot the super mighty putty step...
Redwood shakes his head in disbelief....
cwhyu2
04-19-2009, 11:27 PM
You forgot the super mighty putty step...
Redwood shakes his head in disbelief....
And I am rotflmao.Needed something to cheer me up.
Here is how 1 Home inspection company recomends fixing an active water leak with out turning off the water...
Fix A Water Pipe Leak
[ Family Circle Archive ]
http://www.accuratebuilding.com/images/orangebar.jpg
Plumbing: Water Pipe Leak
By Al Ubell & Label Shulman
From article, “New, Easiest Home-Repair Guide Ever”
Published September 1, 1981 - Family Circle Magazine
http://www.accuratebuilding.com/images/publications/family_circle/fc_home_repair_guide/leaky_pipe2.jpg
Into everyone's life some rain must fall, so the poets say. But when the water comes from a pinhole leak in a water pipe, it's hard to look on the bright side. Although a leaky pipe may create a mess, repairing it is one of the easiest of plumbing jobs for the beginner: Why call a plumber, who may charge you $50? You can fix it yourself for pennies!
“Utensils” (Tools):
None
http://www.accuratebuilding.com/images/publications/family_circle/fc_home_repair_guide/taping_pipe.jpg
“Ingredients” (Materials):
A few round wooden toothpicks, epoxy glue, strips of cloth, 1″ wide, or gauze bandage
Instructions:
It's not always necessary to turn off the main water supply to make this repair. Simply locate the pinhole leak and insert the point of a wooden toothpick into the hole, as far as it will go, and leave in place. (In some instances, two or three toothpicks bunched together may be required.) The wood of the toothpicks will swell, and the leak should stop.
Once the leak has stopped, dry the outside of the pipe surrounding the leak.
Break off the excess toothpick(s).
Mix equal parts of epoxy glue (catalyst and resin), following the instructions on the package. Apply the epoxy around the pipe with an extra dab at the leak point.
Take the gauze or cloth strip and wrap it around the pipe like a bandage. Generously apply more epoxy glue around the “bandage.” When the glue dries, your leaky pipe will be permanently fixed.
http://www.accuratebuilding.com/images/abi_logo_emblem_sml.gif
jimbo
04-20-2009, 06:09 AM
Here's the bad boy... and the itty bitty hole in the wall I made around it (trying to save the new texture if possible).
http://www.longmontsculling.com/TikiWiki/show_image.php?name=pipe_hole.jpg
If it is any consolation, doing a large patch in drywall, including texture, is almost EASIER than doing a small one like that. So don't let the drywall issue affect your decision.
I have brazed holes closed, but that one is too close to the top plate considering the amount of heat required. Cut the tubing at the hole, slide a slip repair coupling onto the tubing, line it up again, slide the coupling up onto the other section of tubing, solder the coupling.
Redwood
04-20-2009, 10:01 AM
Here is how 1 Home inspection company recomends fixing an active water leak with out turning off the water...
Fix A Water Pipe Leak
[ Family Circle Archive ]
http://www.accuratebuilding.com/images/orangebar.jpg
Plumbing: Water Pipe Leak
By Al Ubell & Label Shulman
From article, “New, Easiest Home-Repair Guide Ever”
Published September 1, 1981 - Family Circle Magazine
http://www.accuratebuilding.com/images/publications/family_circle/fc_home_repair_guide/leaky_pipe2.jpg
Into everyone's life some rain must fall, so the poets say. But when the water comes from a pinhole leak in a water pipe, it's hard to look on the bright side. Although a leaky pipe may create a mess, repairing it is one of the easiest of plumbing jobs for the beginner: Why call a plumber, who may charge you $50? You can fix it yourself for pennies!
“Utensils” (Tools):
None
http://www.accuratebuilding.com/images/publications/family_circle/fc_home_repair_guide/taping_pipe.jpg
“Ingredients” (Materials):
A few round wooden toothpicks, epoxy glue, strips of cloth, 1″ wide, or gauze bandage
Instructions:
It's not always necessary to turn off the main water supply to make this repair. Simply locate the pinhole leak and insert the point of a wooden toothpick into the hole, as far as it will go, and leave in place. (In some instances, two or three toothpicks bunched together may be required.) The wood of the toothpicks will swell, and the leak should stop.
Once the leak has stopped, dry the outside of the pipe surrounding the leak.
Break off the excess toothpick(s).
Mix equal parts of epoxy glue (catalyst and resin), following the instructions on the package. Apply the epoxy around the pipe with an extra dab at the leak point.
Take the gauze or cloth strip and wrap it around the pipe like a bandage. Generously apply more epoxy glue around the “bandage.” When the glue dries, your leaky pipe will be permanently fixed.
http://www.accuratebuilding.com/images/abi_logo_emblem_sml.gif
That is too funny Cass!
The tips they publish in magazines...
I'm trying to remember if I was charging $50 back then LOL
On a side note a few years back my mom's well PH went low and she started getting pinholes. It was interesting because her pipes were relatively this and I was cutting the pipes right on top of the hole without any crushing then using repair couplings. before the situation got under control with the treatment system I made her a kit of pieces of flat rubber and hose clamps to temporarily patch pinholes until a few were saved up then I would repair them all at once.
It worked!
Thankfully that was 20 years ago and she has been pinhole free along time averting a repipe.
boulder_deb
04-20-2009, 03:13 PM
Only one pack of bubble gum needed by the plumber, which remarkably was not even suggested here!
Looks like I'm ready to go shooting again - found the hot water line too now that the wall is open. Plumber did a great job saving my wall, and doing what seems like a nice, real repair - and gave good advice about the rest of my project. :)
http://www.longmontsculling.com/TikiWiki/show_image.php?name=pipe_after
Thanks for all the info and advice - you guys are great too!
Deb
SewerRatz
04-20-2009, 03:17 PM
Only one pack of bubble gum needed by the plumber, which remarkably was not even suggested here!
Looks like I'm ready to go shooting again - found the hot water line too now that the wall is open. Plumber did a great job saving my wall, and doing what seems like a nice, real repair - and gave good advice about the rest of my project. :)
http://www.longmontsculling.com/TikiWiki/show_image.php?name=pipe_after
Thanks for all the info and advice - you guys are great too!
Deb
Looks good Deb, thanks for posting the second Pic. Its nice to see a problem resolved.