How to pour a lead plumbing joint.

Terry

The Plumbing Wizard
Staff member
Messages
29,942
Reaction score
3,483
Points
113
Location
Bothell, Washington
Website
terrylove.com
A bit ago, Mark posted some pictures of one of his jobs.
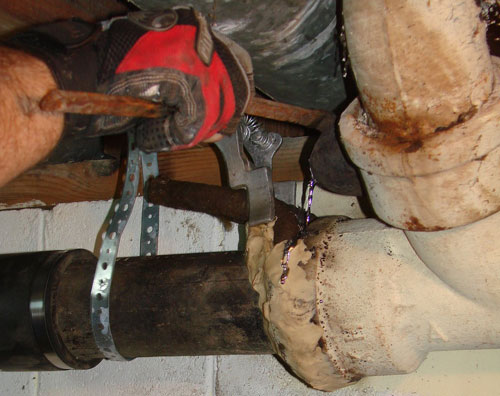
Pouring a lead joint in a basement.

Here is the link to the project here,

Pouring a Lead Joint

mark_10.jpg


Pouring a Lead Joint
 
Didja caulk the joint with both the inner and outer irons, and was it one continuous pour? :D
 
joint

1. The oakum is NOT to keep the lead from leaking out, it is what SEALS the joint. The lead then seals the oakum.
2, I have never used putty on the running rope, and a wad of oakum seals the funnel.
3. Normally you cut the wedge of excess lead off before caulking.
4. You could also use the rubber snap around running rope.
 
lighten up on the coffe --- HJ

1. The oakum is NOT to keep the lead from leaking out, it is what SEALS the joint. The lead then seals the oakum.
2, I have never used putty on the running rope, and a wad of oakum seals the funnel.
3. Normally you cut the wedge of excess lead off before caulking.
4. You could also use the rubber snap around running rope.


you really are way too serious HJ....

I used putty on the outer and ring and around the hub to
be 100% sure that their were no gaps so that the lead might pour out....
I really only wanted to do this once...

as far as caulking the joint, I only had one chisel,

I used to have some very interesting caulking chisels
laying around the junk room of the office.
but for now they are lost . I only had an inner chisel handy


perhaps when we go back to the job I will take a close up of the
actual lead joint to show how you are supposed to caulk around the
inner and then the outer edje of the hub....


if you ever get a chance to look at some very old joint sometimes
it appears like the fellow caulking the joint was actually trying to make a design in the lead....


like art work...

mine comes no-where near what those fellows could do...
 
Last edited:
comments

Just trying to keep the record straight and clear up any misunderstandings. I often did "art work" in the wider joints by creating a herringbone design with the irons. There were left and right offset irons to work behind the pipe in tight spaces, extra short "pony" irons for close spaces, upside down irons, and probably a few more that I have forgotten.
 
Just trying to keep the record straight and clear up any misunderstandings. I often did "art work" in the wider joints by creating a herringbone design with the irons. There were left and right offset irons to work behind the pipe in tight spaces, extra short "pony" irons for close spaces, upside down irons, and probably a few more that I have forgotten.

I have a collection of about 25 irons in various configurations including a bunch that I either made or modified myself. It is rapidly becoming a very lost art, but I still teach it to 2nd year students. Might come in handy and hell,, it's fun. Everyone likes working with molten metal, I think it's a primal thing. Like a camp fire. I don't use putty either, just a wad of oakum. Now let's all set up to pour an upside down verticle joint, 4" :D
 
Okay NH Master...

14265_83_2.jpg


Pour away!:cool:
Scuuze me while I go look for my Joint Runner...
It's been a while since I used it!
 
something about playing with molten lead....

I have a collection of about 25 irons in various configurations including a bunch that I either made or modified myself. It is rapidly becoming a very lost art, but I still teach it to 2nd year students. Might come in handy and hell,, it's fun. Everyone likes working with molten metal, I think it's a primal thing. Like a camp fire. I don't use putty either, just a wad of oakum. Now let's all set up to pour an upside down verticle joint, 4" :D


Pouring one upside down would be a challenge

If I were to try an up-side down joint, I would certainly need to have a large pot of lead boiling
becasue I dont think it could be accomplished with
just one ladel full of lead...I would have an apprentice standing by with the second ladel full.....

let the extra lead spatter down the the floor everywhere....

and I would certainly use my plumbers putty to completely seal off that rope runner...


I still got all those special irons squirreld away somewhere...

I am glad they came up with no hub clamps
and fernco fittings.......

Pouring a Lead Joint
 
Last edited by a moderator:
Now I know what that old asbestos rope in my grandfathers tool box was for. I inherited most of his tools long ago and don't know what half of the stuff is for.

He used his gasoline torch unitl he retired, he liked it better than a propane torch.
 
Thanks for this informative thread! I never knew that much about lead and oakum joints and while I darn sure have no thoughts of ever attempting to make this a DIY project, it certainly makes me appreciate you "old timers" that can do this art form.
 
when I was a kid...

I think back to when I was a kid and

my grandfather + father used to take me into work when I was about 8,, he had a large propane tank
like you see on the gas grills....

then on top of them they had a platform for a
large pot of boiling lead to sit over an large flame

they would keep this thing burning all day long on
the job and it was my job to keep throwing lead into the
large lead pot and keep it full for them...

I would go around the job site and pick up all the little
spills of lead and re-fill that pot....

the dam thing would be a little top heavy and occasionally spill over ... that was exiceting.....

today, .....OSHA would have thrown the book at us..


..

 
Hell guys if you need someone to pour you some lead joints just call on a plumber in Chicago. They do not want anyone using a TY-seal (rubber gasket) instead of lead and oakum. They still have pouring a 4" lead joint on the Illinois state test. Each of our trucks have all the equipment needed to pour the joints. I still do it even in the suburbs even though the suburbs allow for the rubber gasket to be used. It impresses the home owner that a young man like me is doing old world style plumbing.

Here is a link to on of many places that still sell the tools of the trade. http://www.mephistotool.com/caulkingIrons.html

There is these new joint runners that I seen at the local union hall they are a rubber clamp type, I tried to search the net for a picture but I fail.
 
joint

Nice picture of the upside down joint. Now if you will tell me how you evacuate the air from the joint so the lead can fill the void, I will be happy, and believe that it can be done. When I had an upside down joint, I poured it first before I installed the fitting. That is also what I told my instructor when he tried to tell me about "pouring" upside down joints. But, then, he was trying to put one over on the students.
 
Pouring an up-side down joint...

Nice picture of the upside down joint. Now if you will tell me how you evacuate the air from the joint so the lead can fill the void, I will be happy, and believe that it can be done. When I had an upside down joint, I poured it first before I installed the fitting. That is also what I told my instructor when he tried to tell me about "pouring" upside down joints. But, then, he was trying to put one over on the students.

getting the air out of an up-side down joint is easy HJ....


all you got to do is drill a little vent hole in the cast hub
so the air can escape while pouring it.....LOL....


then all you got to do is figure out how to plug up that little hole

perhaps when you caluk down the lead it will cover the weep hole ...LOL


...
 
A ship I served on early in my Navy career had teak decking on all the weather decks. Teak planks were about 5" wide and 3½" thick. They wore like iron, but on occasion needed some recaulking. There was about a 3/8" wide joint between planks, and oakem was driven in with the irons, and then it was top sealed with some hot tar. In the 60's, they were still having some nubs holystone the deck once a week, but finally gave that up....something about cruel and unusual punishment!

On today's market, there must have been a million dollars worth of teak! The ship was 530' long, and the main deck, 01 and 02 decks were teaked.

By the way, that ship, built in 1942 and decomissioned in 1982, is still in existence. Actually, it has so much asbestos and PCB that the Navy has been thwarted at every attempt to have it cut up for scrap. It is to the point that it may now be turned in to a museum!
 
When I was first learning the trade from a master plumber he had a set of inside & outside irons with his initials on them. There was no doubt as to what joints he did.

John
 
Back
Top