View Full Version : Shower handle sticking out too far
alphonse55
12-31-2007, 01:07 PM
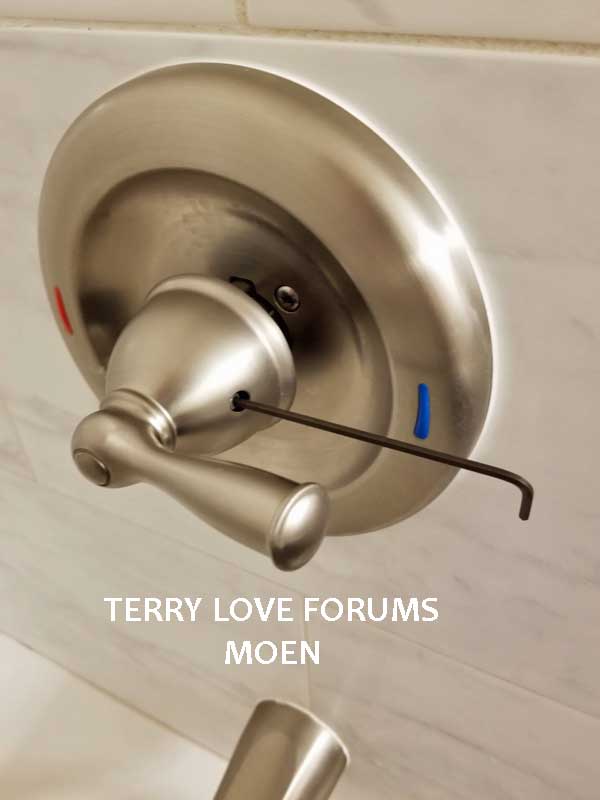
I have lurked on these boards for a while and it has been a lot of help. I just signed up because I have my first question. I am in the middle of remodeling my bathroom. I got a Moen shower/tub faucet kit from Lowes. It is pretty simple. Model 82496BN. Anyway, my plumber begrudgingly (he was not happy with me shopping at Lowes or Home Depot) installed it. The problem now is that the handle sticks about 2 inches from the wall plate (not sure what that piece is called). I have taken enough showers in my life to know that it does not look right. I contacted Moen who informed me that none of their products should look like that when installed properly. My plumber blames it on poor products being sold at Lowes, and the pictures on the box being deceptive. Anyway, does anyone know why this would happen with the handle sticking out that far? Is it something simple that was overlooked during the install, or is my plumber right and everything sold at Home Depot and Lowes is junk? Any help is greatly appreciated. Thanks.
MACPLUMB 777
12-31-2007, 01:15 PM
Poor Install By Plumber, Did Not Fit To Finished Wall Correctly, No Matter
Where Tub/shower Valve Came From
Jerrymac Masterplumber
Daydream46
12-31-2007, 02:17 PM
Just to illustrate my husband's (alphonse55) point...
This is what our shower currently looks like....
http://img31.picoodle.com/img/img31/5/12/31/f_DSCN3972m_1f72fc9.jpg
http://img34.picoodle.com/img/img34/5/12/31/f_DSCN3971m_62681ce.jpg
this can't be right
jadnashua
12-31-2007, 04:35 PM
Aesthetically, maybe not, but it is within the limits of the valve. If you couldn't get the plate flat against the wall or there was unfinished metal showing, then it would be out of spec. It would have looked better if the valve was further back, but there is nothing technically wrong with it IMHO.
GrumpyPlumber
12-31-2007, 04:58 PM
Those valves, as with most, are made to have variable depth to a degree.
Jim states it well above...as long as the flat trim plate is on the finished surface and the chrome tube covers the area between the trim plate and the handle, it's installed correctly.
As for your plumber, he has valid reason to be apprehensive.
The worst experiences we come across are merchandise, stock & fixtures purchased by the homeowner.
A great example is the LAST Glacier Bay faucet I'll ever do...customer got a kitchen faucet for less than $40 and expressed dismay with my workmanship when the faucet was flimsy.
Purchases from HD & Lowes have repeatedly proven to procure lower quality stock.
A great example is the faucets they carry, there really is a difference.
Plumbing suppliers sell very few faucets with plastic parts.
MFG's offer the box stores more "homeowner" oriented fixtures...they may look similar, but there are alot of plastic parts that are chrome plated to appear to be quality, despite having the same MFG name.
Redwood
12-31-2007, 06:47 PM
I agree with Jim and Grumpy... Its not great but it is within the limits.
If it were installed improperly, the trim plate would not have fit against the wall, and then you would have a reason to gripe and a real problem. As it is, it is a normal installation. your real problem is that Moen makes that "clunky" handle that never looks right no matter how you install the valve.
GrumpyPlumber
01-01-2008, 09:44 AM
If it were installed improperly, the trim plate would not have fit against the wall, and then you would have a reason to gripe and a real problem. As it is, it is a normal installation. your real problem is that Moen makes that "clunky" handle that never looks right no matter how you install the valve.
I agree, though it's not a bad valve, the handles are flimsy.
Daydream46
01-01-2008, 12:26 PM
I guess the point is that we had a functioning bathroom... but we are having the whole thing redone for aesthetic purposes... while it may function ok, it looks bad... We are paying too much to have a bathroom that looks wrong.
My husband called Moen and they said the max it should stick out is 3/4 of an inch, but even then 1/4 of an inch is really more acceptable...
Moen told us to tell the plumber to move the valve back. Is this even possible at this point? The fiberglass walls are already up... do they need to be taken down?
If we just bought a new trim kit can it be installed at this point?
jimbo
01-01-2008, 02:02 PM
If this were starting from scrach, with the walls open, you would have had more leeway with setting the valve body a little further back. If your plumber had to work through the 6" diam hole in the fibreglas, or even if he had an access at the back side, he maybe did the best he could to just get the valve in, and did not have options about location.
Daydream46
01-01-2008, 03:05 PM
If this were starting from scrach, with the walls open, you would have had more leeway with setting the valve body a little further back. If your plumber had to work through the 6" diam hole in the fibreglas, or even if he had an access at the back side, he maybe did the best he could to just get the valve in, and did not have options about location.
the walls were completely open... they actually reframed the whole room, so I was just under the impression that for the price tag everything would be perfect
jimbo
01-01-2008, 04:53 PM
He might have put it in a little differently in that case. Was he informed what the thickness of the finished wall would be?
This drawing shows how it should be installed: http://www.moen.com/shared/pdf/82496sp.pdf
Daydream46
01-01-2008, 05:28 PM
He might have put it in a little differently in that case. Was he informed what the thickness of the finished wall would be?
This drawing shows how it should be installed: http://www.moen.com/shared/pdf/82496sp.pdf
he put up the walls with the contractor...
jimbo
01-01-2008, 07:35 PM
OK, we have answered all the questions except the basic one asked in the first post: What's wrong, and is the faucet defective because it was from HD or Lowes.
1) It was just not installed correctly.
2) Moen is Moen, and it is a good brand, and with that or any brand, it does not matter where you got it. HD/Lowes do not stock faucets that stick out too far just because somehow they are cheaper.
chel_in_IL
01-02-2008, 12:59 PM
Wow.. that looks bad!
I completely remodeled my bathroom all the way down to the studs. I also have a Moen faucet, a bit different "style" than yours, but I bet you the guts are still the same. When we put the new valve in, we put into place the fiberglass surround and removed it several times, adjusting the placement of the valve to make sure it fit correctly. (2 pc tub, it was a pain to keep adjusting it, but you can't do it after the sheetrock is in place..!)
You can see in my pic that we had to add a couple of elbows to move the valve back far enough for it to sit right on the surround wall.
http://mjwidell.smugmug.com/photos/218444890-L.jpg
(Ignore the wonderful electrical wire that was draped over the pipes - we removed this. >smile<)
It looks to me that the valve was placed too far forward in the wall cavity, which is why the handle is sticking out like it is. It should have been placed further back in the wall cavity, but now that your bathroom is done, it would be very difficult to change this without removing the surround or accessing it from the other side of the wall.
When properly done, this is how it should look...
http://mjwidell.smugmug.com/photos/219398002-L.jpg
Terry
01-02-2008, 03:30 PM
According to Moens own specs, they allow 1-1/4" tolerance plus or minus.
If you found someone at Moen that doesn't agree with their engineered specs, then either that one person is wrong, or they need to change the spec sheet.
However, that being said, everything about that valve is working and I've seen many installed that way and in use.
A note to Chel,
Why did you plumb with galvanized pipe?
Combining galvanized and copper is never a good idea.
chel_in_IL
01-02-2008, 05:27 PM
A note to Chel,
Why did you plumb with galvanized pipe?
Combining galvanized and copper is never a good idea.
Talk to the fiance...
chel_in_IL
01-02-2008, 05:36 PM
BTW, it's not directly copper to galvanized. The rest of the house is galvanized, and the shower valve is in between the two metals. From what I've read online, this is acceptable (but correct me if I am wrong.)
Terry
01-03-2008, 04:02 PM
BTW, it's not directly copper to galvanized. The rest of the house is galvanized, and the shower valve is in between the two metals. From what I've read online, this is acceptable (but correct me if I am wrong.)
It's okay to run galvanized to a brass valve.
It's more like,
why?
I just like removing all galvanized whenever the walls are open.
Galvanized makes for rusty looking water, though the rest of the house has them anyway.
DianaJ
01-23-2008, 09:52 PM
My plumber just replaced an old Delta single handle shower/tub fixture and installed a Moen 82496bn. I chose this Moen because it had a spout that didn't protrude too much and a smaller shower head. The handle sticks out about 3.75 inches+ from the finished wall ( the gap between the handle cover and the wall plate is about 1 1/4 inch. It is not aesthetically pleasing at all, but I have an older house and I'm only willing to do repairs without remodeling or tearing out walls. The plumber and I didn't want to break the tile and open the wall beyond the existing 6 inch diameter opening. The wall tiles are not thick but the mudded wall behind it is about 1 inch thick. Is there any adjustment that can be made to reduce the gap? Thanks to everyone for all the information. Jim's link to the Moen specification website was very helpful as well as Terry's information on Moen's tolerance for installation.
Redwood
01-23-2008, 10:08 PM
chel_in_IL, In any future project I would get rid of as much of the Galv, as possible. At least the stuff in any wall that is opened up! Just put a 8" brass nipple between any copper and Galv. connection.
DianaJ
01-27-2008, 05:26 PM
The Moen showerhead in the 82496 kit seemed to have much more volume than 2.5 gpm spec. Turns out the internals were defective and missing part of the restrictor. So I used a Grohe showerhead that I had from 10 years ago and it now has the proper flow volume out of the showerhead which is much better than the excess volume out of the moen valve water spout. Along with the extra swivel from the Grohe showerhead makes this Moen acceptable; even with the unappealing Moen handle sticking out problem.
patrick88
01-27-2008, 07:10 PM
My plumber just replaced an old Delta single handle shower/tub fixture and installed a Moen 82496bn. I chose this Moen because it had a spout that didn't protrude too much and a smaller shower head. The handle sticks out about 3.75 inches+ from the finished wall ( the gap between the handle cover and the wall plate is about 1 1/4 inch. It is not aesthetically pleasing at all, but I have an older house and I'm only willing to do repairs without remodeling or tearing out walls. The plumber and I didn't want to break the tile and open the wall beyond the existing 6 inch diameter opening. The wall tiles are not thick but the mudded wall behind it is about 1 inch thick. Is there any adjustment that can be made to reduce the gap? Thanks to everyone for all the information. Jim's link to the Moen specification website was very helpful as well as Terry's information on Moen's tolerance for installation.
I would assume your plumber installed it to the best of his ability with the limits he faced. Opening the wall might not have give the valve any more room to move back. The wall behind is a big factor also.
guess the point is that we had a functioning bathroom... but we are having the whole thing redone for aesthetic purposes... while it may function ok, it looks bad... We are paying too much to have a bathroom that looks wrong.
My husband called Moen and they said the max it should stick out is 3/4 of an inch, but even then 1/4 of an inch is really more acceptable...
Moen told us to tell the plumber to move the valve back. Is this even possible at this point? The fiberglass walls are already up... do they need to be taken down?
If we just bought a new trim kit can it be installed at this point?
The shower valve should have come with a thin plastic plate. This is attached to the valve body for thin plastic walls. It hold it so the valve sticks out within tolerances.
ejacobson
07-07-2008, 05:08 PM
This thread may have saved my butt.
I have the same problem alphonse55 and Daydream46 have. My plumber probably didn't read the installation specs and mine is a Moen as well. The valve sticks out such that it leaves about an inch gap between the handle and trim plate. I was thinking there was no way to fix this without ripping off my newly tiled wall and repositioning the valve. But then I saw this post...
Here are two pictures of mine, below, after applying the same workaround (i.e., using the Stop Tube to bridge the gap). I added rubber washers to the screws since they will be exposed now. Also, the shiny stuff around the Stop Tube is fresh caulk. I added the caulk because I didn't trust the weak little gasket where the trim plate meets the Stop Tube.
I have a question, though, about the black tube (spans gap between wall trim plate and handle) referred to as the "Stop Tube Kit" in Moen's specs. According to the Moen manual, http://www.moen.com/shared/pdf/instruction_sheets/INS795C.pdf, (see step 6), the tube thingy, part B, is supposed to be used if the valve is too far back into the wall. But in this thread, it was used to fix a problem with the valve being too far out of the wall.
1. What is this piece truly intended for?
2. If it was meant to be used back inside the wall why would its finish match that of the handle? In other words, it certainly looks like it was designed to be seen, not hidden.
3. Finally, many people on this thread are saying this is acceptable. When I look at the wall side of the handle piece (see 3rd picture), I certainly can't believe Moen designed it to be away from the wall in some installations. Am I missing something.
steveg91
07-07-2008, 09:18 PM
I think the plumber failed to check how far out the finished product would be. (Maybe because he didn't like where you bought the product he didn't pay as much atttention to the job...)I always insist on having the finish plumbing on hand so I can verify what the finished product will look like before I install anything.
I'm getting the feeling that these answers are backing up the "plumber" out of professional respect or because we all know how difficult some jobs can be.
Bottom line though is that it is sticking out to far, period. As was mentioned, maybe it can be fixed by opening the wall behind it.
I'm getting the feeling that these answers are backing up the "plumber" out of professional respect or because we all know how difficult some jobs can be.
Now you are attacking our credulity. The MANUFACTURER is the one who decides the +/- tolerance of the valve. Exceed those limits and you either cannot install the trim parts, or you have to add a "deep rough" adapter. Between the + and the -, whatever they are is an acceptable installation. I personally prefer to hug the shorter distance, even if it puts the handle out further, because, regardless of what I am told will be the finished wall, customers often decide at the last minute that a thicker tile, or a mud method installation would be a lot nicer. Sometimes, such as with a couple of mine in the last two months, they decide to use a tile that is 1" thick, and it exceeds the +/- tolerances and still has to be opened up and reset. Some manufacturers have such a tight +/- that it might as well not exist. For those the plumber has to know the EXACT wall thickness and the carpenter and tile installer MUST keep keep it to that dimension, which seldom happens.
jadnashua
07-08-2008, 07:51 AM
Put another way, if the trim fits, it is proper per the manufacturer. Now, you may not like the look if it sticks out at the max, but you'd hate it if you had to tear out the wall to fix if it was too recessed to fit on.
It is risky to get the rough-in set the minimum, as it only takes a whisker to make it not fit.
ejacobson
07-08-2008, 10:12 AM
I'm hoping someone will be able to answer my 3 questions in post #24.
BTW - I showed my plumber actual pieces of the tile I planned to use and went over the plans for the 1/2" backerboard, furring strips, and vapor barrier. I also showed her the finished plumbing (e.g., trim plate, lever). She took notes in a scrappy old notebook. At a later visit she had trouble finding any of my information. As I watched her flip through scraps of paper I realized she was probably not organized enough to keep up with details.
However, it sure would be nice if companies like Moen would put a little more flexibility into their products. The valve sure depends on a lot of other things falling perfecting into place...
jadnashua
07-08-2008, 11:06 AM
You seem to be missing the point! If you asked for the fixture to be set a certain way and it wasn't, then you have a leg to stand on. If it was plumbed with the bits fitting per the allowable tolerances of the manufacturer, barring other agreed instructions, it is correct. Some bits require extremely tight tolerances of less than 1/16". Just a slight difference in thickness of thinset or a slightly warped tile and it wouldn't fit...they design most things for more tolerance than that, and that is what you got with the fixture you have.
It is correct if the faceplate can seal and the handle can fit on using the stock bits, spacers, screws, etc.
It can be moved, but at this point, would be extra cost, not a plumber's mistake. Often, the allowable tolerance is as much as 3/4-1".
ejacobson
07-08-2008, 05:07 PM
jadnashua,
Ha! Are you saying it was my responsibility to tell my plumber to rough-in the valve so the handle could attach like it says it should in the instructions? Like Moen shows in EVERY picture? That is ridiculous. :) Shouldn't the plumber figure that out on their own. Especially after being given all the trim pieces and the installation instructions. They're the experts on this stuff.
jadnashua
07-08-2008, 07:25 PM
If the handle fits, the trim covers the hole, then it was installed within the manufacturer's min/max tolerance. The fact that it looks beter if it is near the min is a matter of preference. If it was critical it be near the minimum, it should be in the written instructions, and if not, and it is within the manufacturer's tolerances, it's technically okay.
mrhutton
01-21-2009, 09:54 PM
To be clear - the problem with the bad aesthetics is due to Moen's incorrect instructions.
The Moentrol valves come with a plastic disc affixed to the face of the valve, and this disc is clearly stamped "IMPORTANT! THIS SURFACE MUST BE FLUSH WITH FINISHED WALL".
And if one abides by these instructions (i.e., setting the valve in the rough framing with the face of the disc protruding ~13/16" past the face of the studs to accomodate .5" Durock + thinset + .25" tile), then yes, the back of your finished valve handle will have roughly an inch of gap between it and the face of the escutcheon when in the "off" position (and will surely make your wife cry).
The asthetically-correct install requires the face of the plastic disc to be roughly 3/4" *recessed* before the face of the finished wall - *not* flush with it. (or roughly flush with the face of the studs if using standard .5" rockboard and .25" tile.) This will give you about 1/4" of gap between the escutcheon and the back of the handle when in the "off" position.
And the Moentrols are not particularly "workaroundable" when it comes to this problem - removing the stainless sleeve might buy you another 1/8", but will also introduce play, expose some of the valve's brass, as well as allow the handle to spin freely over 360 degrees.
All you can do is reseat the valve, and if you're lucky, it just means a miserable weekend of tearing out the back side of the wall (which is hopefully just sheetrocked, if you can access it at all), then sawzawling your mount board and reseating further back instead of redoing your tile work.
I know this because it's what my upcoming weekend entails. Thanks Moen...
PS: I should add that my wife decided-on-and-ordered the finish/trim parts several months after I installed the valve itself, so I didn't have a viable means of testing the finished product during rough-in.
The position of the handle is not a fixed location, otherwise Moen would not give a degree of latitude even with the plastic ground plate. If the faucet was able to be trimmed with the handle and plate, and it works, then it was installed correctly. YOU may not like it, but if it were installed incorrectly, you would like it even less.
mrhutton
01-22-2009, 07:55 AM
The position of the handle is not a fixed location, otherwise Moen would not give a degree of latitude even with the plastic ground plate. If the faucet was able to be trimmed with the handle and plate, and it works, then it was installed correctly. YOU may not like it, but if it were installed incorrectly, you would like it even less.
The first sentence in my previous post speaks of the "aesthetic incorrectness" of Moen's install instructions - I know my "functional install" is correct.
I disagree with your first statement - when the Moentrol is off, the handle's distance is *fixed* relative to the escutcheon (you can still spin it side to side, but this doesn't affect the distance to the plate) - so it could have been roughed in to a tee if their instructions weren't so grossly conservative. My suspicion is that Moen did this as a "CYA" move - it's easier to tell complaining customers that they're just overly sensitive about aesthetics as opposed to having to address the major functional problem incurred when it's roughed in too shallow (and the handle can't even go on the valve).
The short of it is, *every* Moen photo shows their handles and escutcheons spaced by 1/4"..3/8". And if one follows their install instructions to the letter, they should expect the same result - *not* a 1"..1.25" gap!
GabeS
01-22-2009, 10:02 AM
Chel in el,
You definitely should have taken out that galvanized pipe. I also noticed unions that were buried in the wall. You are not supposed to bury unions in the wall. Should have been couplings.
Anyway,
I know that everybody is talking about tolerances. But when I have my installed I do a very simple thing. When you open the box up there is a temporary plastic attached in the shape of a circle. It says on that plastic "THIS EDGE FLUSH WITH FINISHED WALL". That's it. End of story. Doesn't matter what thickness sheetrock or tile or whatever. There is only one finished wall surface.
The pic of the valve looks fine to me. There are no exposed unfinished parts visible. It does stick out further than other valves I've seen (kohler and delta), but still looks fine to me.
GabeS
01-22-2009, 10:30 AM
mrhutton,
I reread your post more carefully after my last post.
If what you are saying is true, then the argument has to be with Moen and not the plumber.
I'm always told and hear it repeated a million times: whenever you are installing something or using a product, the manufactorer's directions and instructions trump all other directions and codes. If they built it, then they know how to install or use it.
If they say this edge flush with finished wall, and then it sticks out after you follow their directions, then that's how it was meant to be. The advertising pics need to be updated or the instructions need to be updated. One or the other.
In this case I do not think the plumber is at fault IF he followed the manufactorer's directions.
mrhutton
01-22-2009, 12:36 PM
> If what you are saying is true, then the argument has to be with Moen and not the plumber.
Correct - I hope I made that clear in my previous postings.
> I'm always told and hear it repeated a million times: whenever you are installing something or using a product, the manufactorer's directions and instructions trump all other directions and codes. If they built it, then they know how to install or use it.
I agree - this is sensible, and is why I did what I did. However this experience has taught me to take the manufacturer's instructions "under advisement" instead of treating as an absolute.
To restate - I see no harm in reseating the valve deeper so that the final aesthetic matches the product brochures - as long as there's *some* clearance between the back of the Moentrol's handle and the escutcheon when the valve is off, then it's functionally correct. For reasons that aren't clear to me, Moen simply opted for bad, over-conservative valve seating instructions.
> If they say this edge flush with finished wall, and then it sticks out after you follow their directions, then that's how it was meant to be. The advertising pics need to be updated or the instructions need to be updated. One or the other.
I agree - as it stands, their brochures are deceiving as they don't accurately depict the finish-installed product (isn't that the whole point of the photos in product brochures afterall?). If I knew it was going to look like it does, or that I'd have to do a non-trivial correction job after the fact, I'd've gone with another brand.
> In this case I do not think the plumber is at fault IF he followed the manufactorer's directions.
Again, I completely agree.
But I've learned my lesson - always have the finish/trim pieces in hand during the rough-in so that you test out the depth for yourself and don't have to rely solely on the manufacturer's instructions. (Geez - so I guess this is my fault afterall and not Moen's, right? i.e., I should've known better than to trust a world-renouned manufacturer... ugh.)
ryanwj
01-24-2009, 04:47 AM
I have a very similar Moen faucet and I followed the installation directions as best I could when I framed the tub surround and mounted the valve. The problem I had was that there were literally NO words on the installation instructions - it was all done with pictures and frankly I'm an engineer and I use drawings on a daily basis and I still never quite understood the Moen instruction sheet per the valve setback. Thus, when I was finished with the installation, I ended up with a valve handle that sticks way out from the wall and just looks bad. It is functional but not pretty. After my experience with the instruction sheet and another with the way the tub spout seats (or in my case doesn't seat) against the tub surround as a function of NPT thread engagement (see my question in another post) I will never purchase another Moen product. I know I probably should not have purchased a unit from HD, but for $150 you would think you could get a decent fixture and instructions to go with it.
1. What is this piece truly intended for?
It controls how far the handle rotates. Without it the handle would just spin 360 degrees.
2. If it was meant to be used back inside the wall why would its finish match that of the handle? In other words, it certainly looks like it was designed to be seen, not hidden.
It was NOT meant to be inside the wall. It IS intended to be seen.
3. Finally, many people on this thread are saying this is acceptable. When I look at the wall side of the handle piece (see 3rd picture), I certainly can't believe Moen designed it to be away from the wall in some installations. Am I missing something.
If you go back to one of your other postings, you complain about companies, like Moen, not having adjsutability. But that very +/- tolerance, which they do give, is what you are complaining about now. IF you had had a fiberglass shower, and IF the plumber had installed it as a "thin wall" installation, the handle WOULD have been the way yours is, AND it WOULD have been Moen's design location for the handle. Regardless of what their customer service "specialist" tells you.
Karace
07-30-2009, 07:37 PM
Help! Moen Banbury 82910
I have the same problem. I have the same unit. The tolerence is very tight.
But the more important issue now is how to fix the problem without removing tile or cutting the opposite wall apart.
I'm looking for a wall plate that is not recessed as much in the center as the original might work great. Does any one know if Moen has such a plate to replace the original?
I'm looking for a different handle that slides futher back over the exposed cartridge. This would require the inside of the handle to be futher reccessed. Does any one know if Moen has such a handle?
Does Moen have options for the millions of installers that did not hit the 1/4 inch tolerance required?
Waiting for solutions, please help.
Does Moen have customer support that may provide part numbers for the possible solutions I have mentioned?
Thanks
Davebutch
07-31-2009, 09:54 AM
And if one abides by these instructions (i.e., setting the valve in the rough framing with the face of the disc protruding ~13/16" past the face of the studs to accomodate .5" Durock + thinset + .25" tile), then yes, the back of your finished valve handle will have roughly an inch of gap between it and the face of the escutcheon when in the "off" position (and will surely make your wife cry).
It would have made me cry, too! Thank God I noticed this thread before I put up the wallboard around my shower valve. I installed the valve (Moen) per the spec, but dry-checked it with a piece of sheetrock and tile after installing the handle, and it did stick out much too far. I will recess the valve further. Thanks again!
jadnashua
07-31-2009, 09:59 AM
There are NO shorter trims, only extensions if the valve is mounted in too far. To recess it, you'll need to move the valve.
papaspudly
07-31-2009, 01:41 PM
I have the same problem, and after much yelling and swearing, I think I found an easy solution.
You can buy a piece called an ESCUTCHEON EXTENSION (the one I bought is made by Moen). Do a Google search for the term and you'll find some distributors (the piece I found is called a Moen Escutcheon Extension 162 - Chrome).
The Extension piece fits between the finished wall and the escutcheon plate, and pushes the escutcheon plate 0.5" from the wall. When installed, it should just look like the escutcheon plate is extra thick, and you will have swallowed up 0.5" of space between the handle and the plate.
I saw that it came in 4 different finishes, and the one I found fits all 7" Moen single-handles.
Once I recieve the piece and install it, I'll post a photo.
That Moen valve is EXACTLY the way I would have installed it, i.e., about halfway between the maximum and minimum settings. That way I am protected against you making the wall a lot thicker, OR a lot thinner than you told me it would be. I also like it that way so the trim plate does not have to be removed to replace the core. (A side benefit is that the screws reach the threads without having to labor trying to get them started.)
cmccowan
09-22-2009, 06:04 AM
Add me to the list of victims of the Moen shower kit from Home Depot (82910 Banburry in my case). The walls were out when it was installed and I now have it covered with drywall and tile. The gap is at least an inch.
I think the take home message is please avoid this product.
jadnashua
09-22-2009, 04:28 PM
No, the answer is to understand the installation instructions, and trial fit the trim if you aren't familiar with the thing prior to determining where to place the rough-in valve. This is something a pro learns early on, and a DIY'er may have to learn the hard way. Depending on your wall finish - tile, fiberglass, solid-surface, etc., the depth will differ. From the manufacturer's perspective, it the trim fits, it is acceptable. Personally, I don't like it sticking out at the maximum, but it's not 'wrong', as it is fully functional.
1. I hope you anchored that elbow for the spout better than your picture shows it.
2. If a plumber put the tub in and out several times to get the valve in "exactly the right location", wherever that is, the customer would start looking at the clock and wonder how much it was costing him.
3. We would have installed an adapter elbow rather than that copper and adapter method you used.
daddio
10-17-2009, 01:38 PM
I seem to have this same problem of too much handle shaft showing when I trial fit. I have not tiled yet, but I cant move the valve back due to obstructions. Would a double layer of 1/2" hardibacker work?
Has anybody tried those Moen escutcheon extender rings, and how do they look and work?
jadnashua
10-17-2009, 05:27 PM
A second layer of cbu would work but it may mean some asymmetry you'd have to live with. All of the extender rings I've seen were to allow trim to fit if the valve was too far in the wall, not too far out. Not that they couldn't make one that would work that way.
daddio
10-18-2009, 03:01 AM
Its called an Escutcheon Extension, Moen part 162.
None of the suppliers around here are familiar with it and I have only seen it on line and mentioned in this thread.
http://www.faucet-warehouse.com/Moen/part/oil-rubbed-bronze/162orb
Anybody seen one?
For $81 bucks for the ORB version, it had better fit perfectly and be beautiful!
johnfrwhipple
10-18-2009, 09:10 AM
Speaking from the side of General Contractor on these lay out points here goes my two bits.
I have found that the rough in trims can be wrong. It happens too often to trust them. Some times you only get the rough in and you need to wait for the trim. So do you wait 3-5 weeks for the trim to nail it - maybe. If you are the type of client that wants it spot on it's the only way.
Every plumber asks the wall thickness. Then sets that rough in in place. What I find happening is that there is no thought or care given to what the plumber has to do to do his job. No backer boards ready, no rough stock etc. In my opinion a plumber shouldn't have to show up on site with a skill saw and lumber.
That cavity that is going to have the rough in installed should have a 2"x10" screwed to the back side of the wall cavity. Scraps of plywood to be used for furring strips ready for use.
Give the Man/Woman the tools to nail it and make it easy and they most likely raise there game.
It happens to often that these points are missed. I believe most times the fault lies in the project manager - the GC. I have learned these lessons only after building bathroom after bathroom.
Get all your fixtures, un-package them and keep all the manuals together - make a book for the plumber. have your plumber put the trim and rough in togehter before the torch even gets brought up. Look for yourself at the adjustment amounts.
My thoughts.
Good luck.
Fistor
10-23-2009, 03:35 PM
Add me to the list of victims of the Moen shower kit from Home Depot (82910 Banburry in my case). The walls were out when it was installed and I now have it covered with drywall and tile. The gap is at least an inch.
I think the take home message is please avoid this product.
Same problem for me, exactly...
The issue here is, like some people mentioned, the "instructions" that came with the kit are pictorial only - which is fine, because like the other guy, I too am an engineer, and am used to reading drawings.
The problem is, no dimensions whatsoever were included on my instruction sheet - it simply showed "thin wall" vs. "thick wall" (i.e. one with tile). No indication of setback of the valve body, etc. were given.
I believe that the general consensus stated here is correct - Moen simply included an "extension" that is more than long enough to cover the variability in most "thick" walls, with the downside that it is generally too long to sit flush. As a DIY'er, I didn't have the experience to accurately judge the wall thickness vs. the seating of the extension within the handle, and now mine too sticks out.
Question: would it not be possible to use a hacksaw to shorten this metal extension by a certain amount that it would then seat properly?
daddio
10-26-2009, 01:44 PM
I doubt you could just cut it off shorter. There are some plastic inserts that go in the shaft.
The solution seems to be either resetting the valve back in the wall or using that Moen part 162 escutcheon extension.
daddio
11-10-2009, 01:36 PM
Anybody try Moen part 162 escutcheon extension to fix this problem?
I doubt you could just cut it off shorter. There are some plastic inserts that go in the shaft.
The solution seems to be either resetting the valve back in the wall or using that Moen part 162 escutcheon extension.
johncommode
02-23-2010, 07:10 AM
So I realize this thread has been going on for a couple years now, but I also ran into this problem. I didn't rush in buying the Moen extension plate. I instead went over to the local Home Depot and just started walking around looking for anything that I could mount on the front or back of the mounting plate and with a matching Satin Nickel finish.
In the faucet repair isle I found a satin nickel lavatory mounting ring (http://204.202.233.236/details.asp?ProdID=85) that worked quite nicely. Using some adhesive caulk, I glued the included rubber washer to the mounting ring and then the ring to the mounting plate.
The end result looks better than what I would have achieved with a correct install.
IF Moen thinks the valve should not protrude more than 3/4", WHY do they design it so that you can have 1 1/2", or more, showing? Just make it so that it can only protrude from 1/4" to 3/4", and then design a bunch of "adapters" to use when the customer decides he wants a thicker, or thinner, finish on the wall.
supermattthehero
05-15-2010, 09:25 PM
Just wanted to add that I had my contractor install a Moentrol shower valve, and was extremely pissed off when it was sticking out over 1", just like many of you. I ripped it all out and now am doing it again.
This time I will try placing the valve so that the plaster ground is flush with the studs, since I have 1/2" durock and 1/4" tile with thinset, just as mrhutton suggests.
quote; This time I will try placing the valve so that the plaster ground is flush with the studs, since I have 1/2" durock and 1/4" tile with thinset
And when you do that you are NOT following the Moen's installation instructions, which WE would when installing the valve. Otherwise WE might end up having to buy a stem extension because the handle does NOT fit the stem. And when we did that, the extension would be 1" long which means the handle would wind up almost EXACTLY where it started out before you redid the installation.
supermattthehero
05-17-2010, 09:47 AM
quote; This time I will try placing the valve so that the plaster ground is flush with the studs, since I have 1/2" durock and 1/4" tile with thinset
And when you do that you are NOT following the Moen's installation instructions, which WE would when installing the valve. Otherwise WE might end up having to buy a stem extension because the handle does NOT fit the stem. And when we did that, the extension would be 1" long which means the handle would wind up almost EXACTLY where it started out before you redid the installation.
That's great. Keep up that contractor-inspired attitude of "CYA." It's good for you and mediocre for the customer.
If you haven't been keeping up with this thread, many of Moen's customers including myself don't like the way that the valve looks as installed in accordance with the instructions. So, we decide to do it over, or fix it. Thankfully, user "mrhutton" has researched the problem carefully and provided a solution that would appear to leave the valve functional and with the desired cosmetic result.
It's really just a matter of preference. One thing you can be sure of though, as a plumber, is that if the customer isn't happy when you leave, it will be the last time he/she calls you.
This is another, "I WANT my Moen valve to look like the one on the display board", when that one was NOT assembled according to Moen's specifications. Moen has a plastic "plate" that is designed to be flush with the finished wall, and WHEN it is installed that way, the handle looks EXACTLY like the ones shown in these pictures. YOU, the customer, can install it with the plate anywhere you want it, because if the handle doesn't fit, it is YOUR problem. IF I install the valve, I will use Moen's specifications, regardless of what you WANT, because otherwise I may have to furnish an extension which will place the handle even further out.
supermattthehero
05-17-2010, 04:50 PM
How many have you installed? Because my contractor installed one with the plaster ground flush with the finished wall, and so did many others on the Internet (you can do a search), and the handle still sticks out too far (unlike the picture). That is why I made my post, that is why mrhutton made his post, and that's why when you search "moen shower handle sticking out" you find several forum and blog posts also detailing the problem. The problem is that the plaster ground thickness is overly conservative so that a little variation won't make it impossible to shut off the valve. Rather, better to be able to shut off the valve and have something that's a little less cosmetically pleasing.
If you're going to insist that everyone complaining about this problem is an idiot who is unable to align a piece of plastic with a finished wall, then so be it. Here is one example of someone who experienced this problem. There are others.
http://forums.construx.com/blogs/earl/archive/2008/04/23/b-tch-n-and-moen.aspx
This is another, "I WANT my Moen valve to look like the one on the display board", when that one was NOT assembled according to Moen's specifications. Moen has a plastic "plate" that is designed to be flush with the finished wall, and WHEN it is installed that way, the handle looks EXACTLY like the ones shown in these pictures. YOU, the customer, can install it with the plate anywhere you want it, because if the handle doesn't fit, it is YOUR problem. IF I install the valve, I will use Moen's specifications, regardless of what you WANT, because otherwise I may have to furnish an extension which will place the handle even further out.
PlumbPowerHouse
06-14-2010, 08:17 AM
the valve depth is incorrect. If the wall is open behind the shower valve, it would be best to loosen the trim plate and back the valve up and secure it to a backing or support. Those valves usually come with a black plate that allows for it to be installed at just the right depth.
Terry
06-14-2010, 11:49 AM
If you set the valve at the correct depth, the handle does stick out farther.
That still works fine, but it won't look like the catalog picture.
Are you even surprised?
Try installing a toilet when the catalog conveniently leaves out the water connections.
Yes, that's right Mame, I had to connect water to your toilet,
Yes, it didn't show water connections in the catalog, that would have been in the instruction manual.
Yes, it's a big connector for a $2400 toilet, but you see, since there is no tank, it needs that large volume connector.
You can't always trust the catalog picture, those come from very artistic people. They sometimes "improve" the photo to make the catalog look better.
Not real world though.
Did you ever notice that EVERY toilet picture shows it against the wall? But, I can guarantee that fewer than 1% are that way when they are actually installed. I am surprised people who complain about the shower handle, do not complain about that also. It is the same thing.
mrbaseball2usa
06-27-2010, 11:28 AM
To be clear - the problem with the bad aesthetics is due to Moen's incorrect instructions.
The Moentrol valves come with a plastic disc affixed to the face of the valve, and this disc is clearly stamped "IMPORTANT! THIS SURFACE MUST BE FLUSH WITH FINISHED WALL".
And if one abides by these instructions (i.e., setting the valve in the rough framing with the face of the disc protruding ~13/16" past the face of the studs to accommodate .5" Durock + thinset + .25" tile), then yes, the back of your finished valve handle will have roughly an inch of gap between it and the face of the escutcheon when in the "off" position (and will surely make your wife cry).
This is exactly what I ran into on my Price Pfister, and now I'm dealing with the same issue of roughly 1" gap between the escutcheon plate and the shower handle. Still researching the best way to overcome.
If you have a problem with the projection of the handle, EVEN when it is EXACTLY where the Moen specifications call for it, regardless of WHAT the Moen "experts" tell you, then call Mike Holmes of "Holmes on homes" and he will tear your entire bathroom apart and put it back together any way you want it, or more precisely the way HE wants it.
andy911
08-04-2010, 08:52 PM
Just finished tiling my shower stall and installed the moentrol Icon hardware, and sure enough the handle is sticking out like a sore thumb. :mad: If anyone has a picture of the fix with the escutcheon extension I'd love to see how it looks.
I have a couple other questions about this hardware, which feels *incredibly cheap* to me:
1)The handle is ridiculously flimsy - there is just a very large amount of flex to it. I'm guessing the plastic piece that is used to attach the handle to the valve is the culprit. Since the handle is lever style every time you pull it in and out it flexes, and just feels very cheap. Is this the typical experience?
2)The face place shows that hot is on the left and cold is on the right. The lever handle faces down (6 o'clock) at mid point. This would imply that a clockwise turn (from 6 o'clock to 9 o'clock) would get more hot and counter clockwise (from 6 o'clock to 3 o'clock) would get more cold. However the adjustment to limit the hot water limits the amount of counter clockwise rotation - in effect limiting the cold! How can this be?
Really really disappointed with this hardware - I thought Moentrol was some of the best around? The tub filler is also garbage - the water spits and splashes out the bottom, and when you pull the lever for shower theres still a lot of dribbling coming out of it....
PlumbPowerHouse
08-10-2010, 07:57 AM
The valve depth is incorrect. There usually come with a black plate that puts the valve at the correct depth. When we put in valves on our new construction site, we put up a backing preset for the correct depth and and we screw the valve to the backing. (A backing is just a 2x4 cut to fit in between the studs of your wall and nailed up to support the valve.)
jadnashua
08-10-2010, 11:15 AM
A pressure balance valve starts out all cold, and the scald limit just limits how far you can turn it to the hot side...that's the way all of that type (that I've seen) work. The extension kits that I've seen can compensate for the valve being too far embedded in the wall, NOT for already being too far out of it. I always suggest people put the trim on and mock it up to determine where THEY want the handle to be before installing and mount the valve accordingly. There is a min/max, but really, those are just the limits of where the trim will fit, not necessarily where YOU will like it. And, there doesn't seem to be a convention of min/max. Personally, I like the handle closer to the wall than the max projection, but based on the manufacturers of these things, if it fits, it's right.
andy911
08-11-2010, 12:07 PM
PlumbPowerHouse, if you look at this thread you will see that the Moen plate is quite simply wrong - if you follow it the handle sticks out 3/4". Jim, IMO you are giving Moen too much credit by using the word "right" - it may be acceptable, but it aint "right"
I figured out that with the Moentrol if you turn the value 180 degrees it reverses the hot and cold. Too bad the face plate is right when the hot water stop is wrong (or vice versa)! Again, a poor design. I also figured out the flex in the handle is as much the valve itself as the plastic coupling - I guess when you have that long of a lever handle its pretty easy to jiggle. Probably should have got the Grohe - those felt rock solid.
Here's my next question - how can I "increase" the usable range of warm water with this valve? I find that the only range on the lever that isn't freezing cold or blistering hot is from between around 5 o'clock and, well, 5 o'clock. (4 o'clock is scalding and 6 o'clock is cold). The valve I bought has stops - can I slightly trim the hot supply? I don't particularly want to turn the water temp down on my hot water heater. Is there another adjustment?
Thanks!
jadnashua
08-11-2010, 08:16 PM
FWIW, the recommended outlet temp of a WH for most domestic use is 120-degrees. You can run the tank hotter, but it is suggested that you install a tempering valve (they are required where I live, but they don't dictate what you set it to). Some DW like the temp hotter, but many also have heaters to get it that way.
andy911
08-12-2010, 05:23 AM
I don't think I have my WH set abnormally hot - it was simply set by the installer as they would normally set it. I'll double check it tonight.
Anyways, I'm thinking that reducing that temp would simply move the sweet spot on the lever, but wouldn't widen the range of usable temperature any.
I'm going to play around with adjusting the hot pressure by trimming the stops - I expect that to work but I fear it is going to reduce my overall shower water pressure too much.
quote; 2)The face place shows that hot is on the left and cold is on the right. The lever handle faces down (6 o'clock) at mid point. This would imply that a clockwise turn (from 6 o'clock to 9 o'clock) would get more hot and counter clockwise (from 6 o'clock to 3 o'clock) would get more cold. However the adjustment to limit the hot water limits the amount of counter clockwise rotation - in effect limiting the cold! How can this be?
Because you are completely incorrect. The handle does NOT point to the temperature, the TOP of the handle, it if had a pointer on it woud do that. ALL the handle does is rotate from ALL COLD, on the right, counterclockwise to ALL HOT, (or warm depending on the limiter stop setting), on the left. IT does NOT limit the amount of cold water. IT limits the amount of HOT water and thus ALL the available cold water produces a reduced temperature warm water.
andy911
08-12-2010, 07:59 AM
You're right - but isn't it crazy that the handle points to the opposite labeling on the escutcheon? there's nothing on the top of the handle, why would anyone assume this is the way it operates? Again, very bad design.
I'm actually going to reverse it to make it do what I want, and not use the hot water limiter (or else drill out the collar to put the limiter screw on the other side)
dustindriver
08-22-2010, 09:10 PM
Hi alphonse55. I know your post is years old, but I just wanted to let you know that I have the same problem. I just moved into a house in Bend, OR, and the original late '90s Moen shower handles stick out about 1.25 inches. I replaced the whole shebang—cartridge, handle, cover plate—in one bathroom and the new one sticks out as well. Seems the original contractor didn't put the valve back far enough. In this house the only way to fix it would be to open a wall and redo the valve or replace the fiberglass tub and put in drywall and tiles.
The reason I'm writing, however, is that I believe there could be a fix. All we need is a thicker cover plate, one that covers the distance between the shower wall and the faucet handle. Maybe we could modify old hubcaps? ;) Anyway, Moen should make some sort of wall cover adapter to bring the cover closer to the handles in installations like ours. I'm going to call them to see if it's a possibility.
spta97
10-25-2010, 01:13 PM
Hi alphonse55. I know your post is years old, but I just wanted to let you know that I have the same problem. I just moved into a house in Bend, OR, and the original late '90s Moen shower handles stick out about 1.25 inches. I replaced the whole shebang—cartridge, handle, cover plate—in one bathroom and the new one sticks out as well. Seems the original contractor didn't put the valve back far enough. In this house the only way to fix it would be to open a wall and redo the valve or replace the fiberglass tub and put in drywall and tiles.
The reason I'm writing, however, is that I believe there could be a fix. All we need is a thicker cover plate, one that covers the distance between the shower wall and the faucet handle. Maybe we could modify old hubcaps? ;) Anyway, Moen should make some sort of wall cover adapter to bring the cover closer to the handles in installations like ours. I'm going to call them to see if it's a possibility.
There is a post a few pages back that showes a nice trim ring that makes it look very good IMO. I can imagine the frustrations on both sides of the argument but wrong instructions are a part of life, no? I did my bathroom remodel with mostly Kohler products and found mistakes in two product manuals (shower door and shower handle like the Moen). Instead of blindly following orders I called up Kohler who admitted to the mistake and pointed me to an online updated manual. Sure it took a little longer, but I wanted to make sure I was doing it right because I only got once chance before I put up the tile.
Moreover, I took all the pieces and test fit them with scraps of the tile I would be using to make sure it lined up properly. In the end, I have a nice finished job that "looks like the catalog" because I know that instructions can be wrong. However, this was the first time in my life I ever did a bathroom remodel...
XDNUT
11-07-2010, 01:40 PM
I have been reading this post on the handle on the Moen valves sticking out too far and some of the remedies. This really intrigued me since I just purchased the Moen veritcal spa kit (http://www.terrylove.com/forums/showthread.php?36021-Moen-Vertical-Spa-when-to-change-pipe-diameter-in-multi-head-shower)and have the rough in valves to install this week but I wont have the trim for about 3 weeks. I know the thickness for my finished wall, so no problem there but if I install this the way the instructions call for and install the volume valves also the same way, is the handle on the temp valve and the volume valves all going to stick out? If I set all of these back 1" is this going to work for all the valves?
Vertical Spa Installation Guide (http://www.moen.com/assets/moencom/documents/literature-center/MF2861.pdf)
XDNUT
11-08-2010, 05:58 AM
Terry,
Thanks for editing my post and placing the installation guide on there. I printed that about 2 weeks ago from a previous post that you placed that on. Great information, as is the rest of this site, but still doesn't explain how deep to set the valves, mostly with this issue of "Handles sticking out too far".
jadnashua
11-08-2010, 01:02 PM
Most of the plaster guards have a min/max value. Most people prefer the look of the thing when it has nearer the minimum projection where the trim will still fit. If you err on this, you'd need an extention kit to allow the trim to fit, then you end up with it sticking too far out again. So, mock up your wall thickness and make sure you are closer to the minimum projection but still within acceptable range, and you'll be okay. The best solution would be to have the trim in hand, and mock the wall thickness up to then decide where YOU like it, rather that a WAG.
XDNUT
11-08-2010, 04:55 PM
Thank you. After talking to Moen today and explaining my concern and the type of trim I am purchasing they assured me that I would not have the same problem since the trim is completely different than the ones shown at the beginning of this post. They also explained that with my trim I only have a 3/16 to 1/4" play which is well within my parameters for the mock up I have made. It is just a matter of putting it all together now.
Thanks again for the help.
45and45
01-23-2011, 12:25 AM
Thanks for posting this information about the Moen Handle Sticking Out Too Far. I was plumbing in the Moen Valve and did a mock up for depth placement with the plastic cover flush with edge of the finished wall. I used a tile and a small peice of drywall to estimate it's thickness. Well I found that it stuck out too far if I followed the Moen instructions (I had to download them as the ones in the box were just pictorial). Yes the handle would function but it wouldn't look good. Kind of like having a door knob stick 6 inches out from a door, it will work but it ain't pretty! I ended up moving the valve further back in the wall cavity before I had put up the drywall, Kerdi and tiles. Very happy in the end but I did a lot of head scratching in the beginning, it sure didn't look like the nice picture they showed. One weird design that could be made a lot nicer looking. Lesson learned, read the instructions, do the mockup, then if it seems wrong go to the internet, chances are someone else has had the same problem with the same model as you. Thanks everyone
Now, IF you had been paying a plumber to install that valve, would you have been happy with the SEVERAL hundred extra dollars he would have charged to go through the gyrations you did to get the handle a fraction of an inch closer to the wall? Especially, if YOU then decided to make a "minor" change in the wall or tile and it became TOO deep in the wall to finish without additional labor or an extension kit? I think not, and THAT is why we use the manufacturer's min/max specifications regardless of the handle's projection from the wall.
Florida Jake
06-28-2012, 03:56 PM
Just to illustrate my husband's (alphonse55) point...
This is what our shower currently looks like....
http://img31.picoodle.com/img/img31/5/12/31/f_DSCN3972m_1f72fc9.jpg
http://img34.picoodle.com/img/img34/5/12/31/f_DSCN3971m_62681ce.jpg
this can't be right
From your post in 2007 I find it funny that I ran into the same problem in 2012. Moen simply sucks. They know that they have this probem and they continue to sell the same junk with the same problems. In south Florida most upscale homes are made with concrete block and stucko with a 1/2 inch nailer, sheet rock then tile (wood is bug food down here). Installed the product per Moen instructions more or less just diagrams.
So when installing the same shower valve five years later I have the same problem and it looks like hell. Pure junk. Moen answer move the valve back to allow the handle to be flush. Oh, you want me to take off the tile, sheet rock, knock a huge whole in the concrete block and change the plumbing just so your junk will be flush. You got to be kidding me. Moen plan B we will send you an extention for the plate that will give the tolarable distance of 3/4 of an inch. Give me a break. Moen shower handle sticks out and looks like crap.
Chad Schloss
06-28-2012, 04:10 PM
"Moen simply sucks. They know that they have this probem"
moen does not have a problem.. it is simply whomever installed the valve who has the "problem"
it is OK where it is. if you wanted it closer, you could have talked to whomever installed it BEFORE it was installed & where you expected it to be.
jadnashua
06-28-2012, 08:26 PM
Moen (and most other manufactuers) give a range of acceptable fitment for their valves. From their viewpoint, if it fits, it's okay. But, since there's a range, it is up to the individual to decide where THEY want it. SOrt of like deciding where to hang a picture...not everyone will like it in the same place. YOU have to try it and decide. The manufacturer is just telling you the range in which it will fit. It's always best to mock up the wall configuration and valve placement to decide if it's the look you are after. If not, and you can't change the valve placement, choose a different brand that may have a different set of limitations that meet your criteria of acceptable asthetics - don't blame the manufacturer on this (although they are not blameless maybe for not telling you).
johnfrwhipple
06-29-2012, 06:21 AM
I have never cared much for the Moen line myself but in order to not make this a "I hate Moen thread" will say that having the trim onsite with the rough in is key to nailing these installs. I'd class Moen in with a huge class of what I call Low End fixtures. These low end fixtures offer a good price and cheap replacement parts. Easy to service. Fast to install. Cheap. Cheap. Cheap.
Higher end fixtures like my favourite Dornbracht ones offer up better design, better site sizing, better leak protection and on and on. The difference is in the install and how the trim is installed.
With some fixtures great effort is needed to achieve a certain look. Perhaps the backing for the Moen shown above was installed as a 2"x10" - perhaps using some 3/4" plywood would have made this install look that much better.
Sometimes its crap in the wall. Maybe the collar is not fully sitting back into the wall???
If you leave these types of choice to the plumbers - you get what you get.
JW
Terry
06-29-2012, 06:31 PM
Here is the same valve as above. A Moen Posi-Temp. I just trimmed this out today.
I like the fact that there is a range that the valve can work at. I'm not a big fan of tearing things out when the surround that gets installed is either too thin or too thick. Moen is pretty hard to screw up. Even if it's set too far back, it's doable.
Kohler does have some tub shower trims that do have a more consistent finished look to them though. There are some options in valve selection.
http://www.terrylove.com/images/moen_tub_brushed_nickel.jpg