PDA

View Full Version : New Drain Set Up...does it look right?


bbillcee
02-25-2007, 04:55 AM
I have a pic of a diagram of what i am going to install for a slop sink and laundry drain....can someone look it over and see if it looks correct!

also if I added a 'Y' fitting directly off the vent to split the drain and used 2 traps is it ok to have a trap about 8 feet away from the the vent stack?
http://www.trance-mix.com/images/drain.jpg

Cass
02-25-2007, 05:36 AM
Go here

http://www.terrylove.com/forums/showthread.php?t=10701&highlight=vent

Post #11

and see how each fixture is vented and drains.

Then redraw and post it.

bbillcee
02-25-2007, 09:43 AM
please see the updated photo

the trap for the slop is within a foot of the vent

i can't use that trap also for the laundry? i would have to use a separate drain and vent?

Cass
02-25-2007, 09:51 AM
The washer needs its own trap and vent.

bbillcee
02-25-2007, 10:19 AM
excuse the ignorance but why would it not work?

no gases would be able to come back into the hosue because of the existing trap? so what potentially would it hurt?

Cass
02-25-2007, 10:26 AM
Each fixture has to have it's own trap and running traps are not allowed.

Terry
02-25-2007, 11:10 AM
Just wye off for the washer below the slop sink trap,
Add a p-trap for the washer and either tie a vent back and revent at 42" above floor, or add an AAV on the trap arm for the washer.

Most of these codes have been determined already by what does and what does not work.
As licensed plumbers, we really don't feel inclined to "reinvent" the wheel,
or to install plumbing that will be "turned down" by the inspectors,
Or waste time and material installing stuff that will be turned down, or cause problems for the homeowner, and future homeowners.

This sounds like a discussion that I would have with my youngest,
A little like answering why rainbows have the colors placed the way they do, and why they have a round arc to them.
Meanwhile, I'm just trying to locate the store I'm driving to.
I may not be able to explain the rainbow, but there it is, for God and everyone else to see.

A lot of the codes covers two things.
Prevent traps from siphoning.
Prevent smells from long untrapped sections of pipe, like in your drawing.
And prevent cross contamination.
Yeah, that's right, three things.
But who am I kidding, there's a lot more than that.
I will be going to Guatamala in March, and will get to see some really innovative plumbing like the stuff in your drawing.
I'll just make sure not to drink their water.

By the way Belieze City had the most horrible smell out in the bay as we boated out to the Cayes. I saw the most amazing collection of mistakes.
The smells were horrible.

When I was there, I told myself that I would try to put on the Internet, better ways for people to plumb. Central American is hooked up to the Internet, but they have no books or libraries.
I asked them how they learned to plumb,
The answer was,

"I just look at the building next door, and copy it"

Too bad for them, there was nothing done right in the first place.

Terry
02-25-2007, 11:33 AM
http://terrylove.com/images/dwv_b2.jpg

plumbing with vents

markts30
02-25-2007, 01:05 PM
1st problem...
You cannot dump waste into a vent pipe...
You have to run another waste...

2nd - you cannot run 2" more than 3'6" from vent to P-Trap (at least here...)

3rd - You cannot have a running trap as was pictured earlier

If you can tap into the waste stack below the fixture the existing vent is venting, we can probably help you do this in a way that will work (and be legal)

bbillcee
02-25-2007, 01:56 PM
[QUOTE=Terry]Just wye off for the washer below the slop sink trap,
Add a p-trap for the washer and either tie a vent back and revent at 42" above floor, or add an AAV on the trap arm for the washer.

QUOTE]

i guess i am deserving of your uncalled for sarcasm.....i am electrician for 20 years and can how truley ignorrant my questions seem to you.

i'd rather not cut into the existing cast iron....so your option of adding a AAV on the trap arm for the washer looks interesting

so whats a AAV!?:p

bbillcee
02-25-2007, 01:59 PM
1st problem...
You cannot dump waste into a vent pipe...
You have to run another waste...


If you can tap into the waste stack below the fixture the existing vent is venting, we can probably help you do this in a way that will work (and be legal)

thanx for a nice helpful post....this would be much work.....including busting out the concrete floor!

FloridaOrange
02-25-2007, 02:37 PM
[QUOTE=Terry]Just wye off for the washer below the slop sink trap,
Add a p-trap for the washer and either tie a vent back and revent at 42" above floor, or add an AAV on the trap arm for the washer.

QUOTE]

i guess i am deserving of your uncalled for sarcasm.....i am electrician for 20 years and can how truley ignorrant my questions seem to you.

i'd rather not cut into the existing cast iron....so your option of adding a AAV on the trap arm for the washer looks interesting

so whats a AAV!?:p

Air admittance valve.
Common brand name: Studor Vent

bbillcee
02-25-2007, 03:00 PM
[QUOTE=bbillcee]

Air admittance valve.
Common brand name: Studor Vent

thanx this looks like it will do fine

bbillcee
02-25-2007, 03:02 PM
by the way....is using 2" pipe for all this ok or should i go to 1 1/2"

thanx

where are u guys from anyway?

Terry
02-25-2007, 05:24 PM
You could just run your washer hose to the slop sink.

A mop sink is also rated at three fixtures, same as the washer and has the 2" trap.

I know a little about electrical, but not enough to give advice on it.
Not that they listen, a friend of mine keeps blowing breakers on her 1100 over the range micro, it's wired to the lighting circuit.
I always try to refer some good electricians that I know.

bbillcee
02-25-2007, 05:49 PM
yeah thats how i originally had it but i removed a giant 2 basin 1935 sink that was about 4 feet long with a slop sinkto the right of it.......plus i am tired of keeping a stocking over the hose and all that.

i will try as u advised with the 'y' fitting with a trap for each and AAV for the washer.....seems like a good enough solution....


thank u for the help

bbillcee
02-26-2007, 04:52 PM
I did the job.....2 slight problems....#1 the slop sinks fills with water when the laundry drains......

#2 the ever so slight drip at the nipple where it connects to the cast iron

when i say slip drip i mean one drip every minute when laundry is draining ....any trick i can do with that???

please tell me if u see anything wrong....this is the 1st time i have done this

http://www.trance-mix.com/images/pvc.jpg

http://www.trance-mix.com/images/pvc1.jpg

Terry
02-26-2007, 05:23 PM
Now that I have pictures, I can see better.
That studor vent (AAV) will help with the washer line.
Good job with that. I see that you used 2", which is code for that.

Darn, it's looks pretty good for your first try.

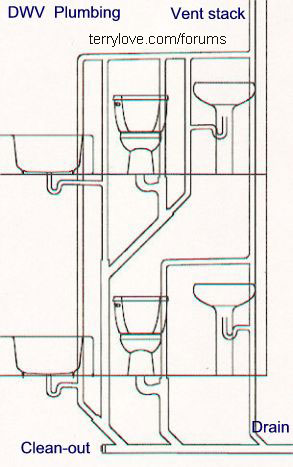
What I don't like is two fixtures on the one trap arm.
If you had cut the cast iron, it would have been pretty easy to have two tees.
The lower one could have been for the washer, and the upper one for the laundry tray.
That way, the upper laundry tray would have the 2" vent going up,
and the lower tee would have supplied the washer that uses the studor vent.

http://www.terrylove.com/images/snap_cutter.jpg

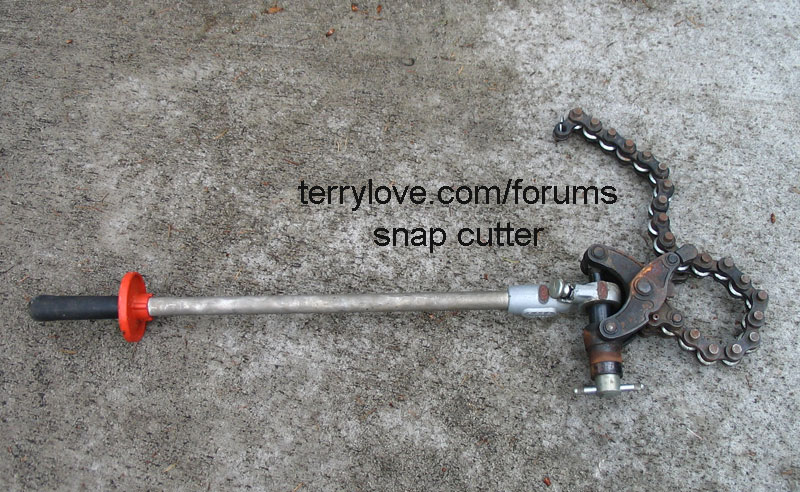
I know that sounds major, but cutting cast is not really that hard.
I sometimes use a 618 sawzall blade, but most often I use a snap cutter for the cast. Snap cutters can be rented.

If you were to ask, will this work the way it is?
I would guess that it would. What you are worried about is whether the trap on the tub siphons or not, that should be easy to see by looking down that drain.
By running the washer water past the tub drain, without the seperation of a vent, that is the risk.

I don't think that is the problem with the tub filling though. You may have a blocked line that needs snaking.

Plumbing tips:
Plastic pipe can be supported every four feet, if that's a concrete wall, you may need a rotohammer for that.
The Laundry tub could have been trapped with a 1.5" p-trap, but the 2" will work nice too.

bbillcee
02-26-2007, 06:26 PM
thanx terry ...i gave the line a quick snake ...i think u may be right.....i think there is a slight blockage....i will give it a better snake tomarrow....

these parts were very inexpensive and now that i got a taste i might do it over the way u said

where would u cut the cast on the lower half?

right below the collar where it connects to the part where i connected to?

and what do u use to connect back? those rubber boots with the screwdriver clamps???

and what pipe gets put back? PVC or cast?

bbillcee
02-26-2007, 06:35 PM
also here is a pic of the cast iron lines.....u may see a easy way to do something different

looking at it again it looks quite simple to just pull that piece out

the top portion of the pipe i connected too turns into galvanizedhttp://www.trance-mix.com/images/pvc2.jpg

Terry
02-26-2007, 08:24 PM
http://www.terrylove.com/images/abs/proflex.jpg
I like using these couplings.

I would see how high you want the tub drain, line up the two tees, and figure on a 2" piece of pipe out of the lower one to the coupling.

Then I would connecto onto the galvanized for the vent above. That means you could reduce to 1.5" above the top tee.
The bottom tee for the washer would be a 2" santee, the top tee could be a 2x1.5x1.5 tee for the tub.

bbillcee
02-27-2007, 02:45 AM
what kinda pipe should i use to replace the vertical run?

PVC?

Cass
02-27-2007, 04:10 AM
Use PVC and 2 of the couplings Terry shows above. You can get them at Low*s they might be another color.

2 other things. Be sure the pipe coming from the washer has 1/4" per foot of pitch and it needs to be supported in at least 1 place and 2 places would be better.

You can add a Y and clean out cap to it (vertical run) for easy access in the future for snaking.

bbillcee
02-27-2007, 04:14 AM
this is a very supportive forum

thanx for the help

i will let u know how it goes

is cutting cast very difficult with the sawzall?

bbillcee
02-27-2007, 04:16 AM
You can add a Y and clean out cap to it (vertical run) for easy access in the future for snaking.


excellrnt IDEA!!!

i love that!!

Cass
02-27-2007, 04:25 AM
You can do it but it may take some time. Do you have a circular saw that you can put a solid fiber metal cutting blade into? That will cut most of the way through faster. Then finish up with a sawsall or just try the sawsall. They make sawsall blades for cast.

bbillcee
02-27-2007, 04:31 AM
i don't i have enough clearence behind the pipe to use the cutter:(


i will try getting the cast sawzall blade


how long would it take to cut a 2 inch piece with proper blade?

Cass
02-27-2007, 04:33 AM
No telling how long, could be fast or slow.

bbillcee
02-27-2007, 04:35 AM
also how hard is it to open those joints on the cast???

after i cut the gal i want to maybe pull that section right out from the top collar the just cut the lower piece out

http://www.trance-mix.com/images/pvc2.jpg

bbillcee
02-27-2007, 04:37 AM
No telling how long, could be fast or slow.

i guess i will tell u later;)

Cass
02-27-2007, 04:44 AM
Just cut out the joints

markts30
02-27-2007, 02:53 PM
Here is the "revised" plumbing...
I added an AAV on the slop sink as well as the washer...

Cass
02-27-2007, 03:42 PM
I love that CAD

markts30
02-27-2007, 04:02 PM
Just spent 6 hrs last weekend drawing up a library of 1-1/2, 2 and 3" PVC fittings...
Now have to do 4, 6, 8 and 10" PVC fittings...

ChrisNJ
02-27-2007, 04:34 PM
That cad is beautiful! What program did u use?

bbillcee
02-27-2007, 05:14 PM
well this is what i did today!!...the vertical run was originally crooked so i put it back crooked ...i might offset to straighten out but thats it for now....do u really think the second AAV is a must?

http://www.trance-mix.com/images/finalpvc.jpg

markts30
02-27-2007, 07:07 PM
That cad is beautiful! What program did u use?
I used plain Autocad 2004 by Autodesk - but all the fittings and pipe I have drawn by hand - extruded them along the fitting centerlines etc...
They are correct in dimensions and takeoffs...
I do it for fun... (closet geek)

Terry
02-27-2007, 07:15 PM
The tub is vented by the vent already.

You only need to have the AAV on the washer, or you could have revented back to the vent that the tub used at 42" above the ground.

markts30
02-28-2007, 03:37 AM
It would appear you used fernco's (rubber coupling bands with stainless clamps but no sleeve) to couple the pipe in - this is wrong as there is no support for the joint - It will move around....
The transition couplings have to have a metal sleeve around the rubber part...

bbillcee
02-28-2007, 03:41 AM
It would appear you used fernco's (rubber coupling bands with stainless clamps but no sleeve) to couple the pipe in - this is wrong as there is no support for the joint - It will move around....
The transition couplings have to have a metal sleeve around the rubber part...

10-4...can i buy those sleeves separately or u have to but the whole thing?

also those sleeves wrap right, i don't need to take the whole thing apart to put them on?

TedL
02-28-2007, 03:49 AM
The sleeves are part of a different style of connector (the style in the pic Terry posted above).

You can't just add them.

Cass
02-28-2007, 03:55 AM
The ones you have now must come off and install the new ones, they are totaly different.

bbillcee
02-28-2007, 04:01 AM
The ones you have now must come off and install the new ones, they are totaly different.


will do.....it should be no problem i hope :rolleyes:

Cass
02-28-2007, 04:14 AM
you may have a problem depending on how much space you have between where the banded coupling goes. Normaly you want only about 1/4-3/8" between the 2 pipes being joined.

bbillcee
02-28-2007, 04:17 AM
you may have a problem depending on how much space you have between where the banded coupling goes. Normaly you want only about 1/4-3/8" between the 2 pipes being joined.

i think i have less than that but we will see....the top one i think will be simple....the bottom might be a bit rough..

Cass
02-28-2007, 04:19 AM
Do the bottom one first.

TedL
02-28-2007, 06:24 AM
Do the bottom one first.

Among other reasons, at the top, if you wind up short, you can easily (cut back if necessary and) add a decent sized length with a PVC coupling, then use the Proflex to connect. (E.g., adding 1 inch isn't doable. Cut 11" and add 12" to get there.)

bbillcee
02-28-2007, 10:10 AM
well it worked out well....after i but in the bottom the top was to long so i trimed about 3/8 in off put the connector on, folded it back over itself and slip it in!!!

all done...the drain is snaked and no back up of water into sink anymore...

i might add the proper vent at a later time but i'm done for now

my sincere thanx to to terry,cass and rest of the crew who showed me what to do!

u will find me around alot as i learn about this new trade....thanx again